Welcome to BB Auto Fix
#1 Rated Auto Service - Your Trusted Partner for Auto Care
BB Auto Fix is a comprehensive automotive service management platform that revolutionizes how auto repair shops operate and interact with customers. Our system seamlessly connects shop owners, managers, technicians, and customers through four specialized portals, creating an efficient ecosystem for vehicle maintenance and repair services.
What is BB Auto Fix?
BB Auto Fix is an all-in-one platform designed to streamline auto repair shop operations from end to end. Whether you're managing a single shop or overseeing multiple locations, our platform provides the tools you need to:
- ✓Efficiently assign and track repair jobs
- ✓Manage technician schedules and workloads
- ✓Track inventory and parts usage
- ✓Calculate and manage shop commissions automatically
- ✓Generate comprehensive reports and analytics
- ✓Provide transparent service to customers
- ✓Handle payments and financial tracking
- ✓Store and manage important shop documents
How It Works
BB Auto Fix operates through four distinct portals, each designed for specific user roles:
🔵Admin creates and manages shops → Sets commission rates → Tracks payments → Monitors platform-wide performance
🟢Shop Manager adds employees → Creates service catalog → Receives job requests → Assigns to technicians → Tracks completion → Manages inventory
🟠Technician receives job assignment → Updates job status → Completes work → Job marked as done
🟣Customer books service → Receives updates → Pays for service → Gets service history
Key Features
Multi-Portal Architecture
Separate interfaces for Admin, Shop Managers, Technicians, and Customers, each optimized for their specific needs and responsibilities.
Real-Time Job Tracking
Monitor job status from assignment to completion with live updates and notifications.
Comprehensive Inventory Management
Track parts, set reorder points, manage stock levels, and get low-stock alerts automatically.
Automated Commission System
Calculate shop commissions automatically based on completed jobs and revenue, with flexible rate settings.
Centralized Document Storage
Store business licenses, certificates, insurance documents, and other important files securely in the cloud.
Detailed Analytics & Reports
Generate reports on revenue, job completion rates, technician performance, and business trends.
Integrated Payment Tracking
Track commission payments, generate receipts, and maintain complete financial records.
Mobile-Friendly Design
Access the platform from any device - desktop, tablet, or smartphone with full functionality.
User Roles & Portal Access
BB Auto Fix provides four specialized portals, each designed for specific user roles with appropriate permissions and features.
Administrator Portal
Super User AccessWho is an Administrator?
The Administrator is the platform owner or super admin who has complete control over the entire BB Auto Fix ecosystem. They oversee all shops, manage platform-wide settings, and monitor overall performance.
What Can Administrators Do?
- •Add, edit, and manage all auto repair shops on the platform
- •View and manage all shop managers and their access
- •Create and organize service categories (Engine Repair, Oil Change, Brakes, etc.)
- •Set commission rates for each shop
- •Track commission payments from all shops
- •Record payments and generate receipts
- •View all shop documents and compliance records
- •Access platform-wide analytics and reports
- •Monitor total jobs, revenue, and performance across all shops
- •Manage their own admin profile and settings
When to Use Admin Portal:
Shop Manager Portal
Shop AdministratorWho is a Shop Manager?
A Shop Manager is the owner or manager of an individual auto repair shop. They have full control over their shop's operations, employees, services, and customer relationships.
What Can Shop Managers Do?
- •Manage their shop's complete profile and settings
- •Add and remove shop managers (if multiple managers)
- •Hire, manage, and track technician/employee performance
- •Assign technicians to specific jobs based on skills and availability
- •Create and maintain the shop's service catalog with pricing
- •Manage parts inventory with stock tracking and alerts
- •Upload and organize shop documents (licenses, certificates, insurance)
- •View comprehensive reports on revenue, jobs, and performance
- •Handle customer cancellation requests
- •Track commission payments owed to the platform
- •Download payment receipts and financial records
- •Monitor daily, weekly, and monthly shop performance
When to Use Shop Manager Portal:
Technician Portal
Service ProviderWho is a Technician?
A Technician is an employee of an auto repair shop who performs the actual repair and maintenance work on vehicles. They use the portal to view their assigned jobs and update work status.
What Can Technicians Do?
- •View all jobs assigned to them in real-time
- •See job details including service type, vehicle info, and customer notes
- •Update job status (Pending → In Progress → Completed)
- •View job location for roadside assistance jobs
- •Track their work history and completed jobs
- •See their daily, weekly, and monthly job statistics
- •Manage their personal profile and contact information
- •View their specializations and skills
When to Use Technician Portal:
Customer / End User Portal
Service RecipientWho is an End User?
An End User is a vehicle owner who uses BB Auto Fix to book auto repair services, track their vehicle's service, and manage their service history.
What Can Customers Do?
- •Browse available auto repair services
- •Book appointments for vehicle service
- •Choose between in-shop service or roadside assistance
- •Track real-time status of their service requests
- •View complete service history for their vehicles
- •Make secure payments for services
- •Request service cancellations when needed
- •Receive notifications on job progress
- •Manage multiple vehicles
- •Save favorite shops for quick booking
When to Use Customer Portal:
Admin Dashboard
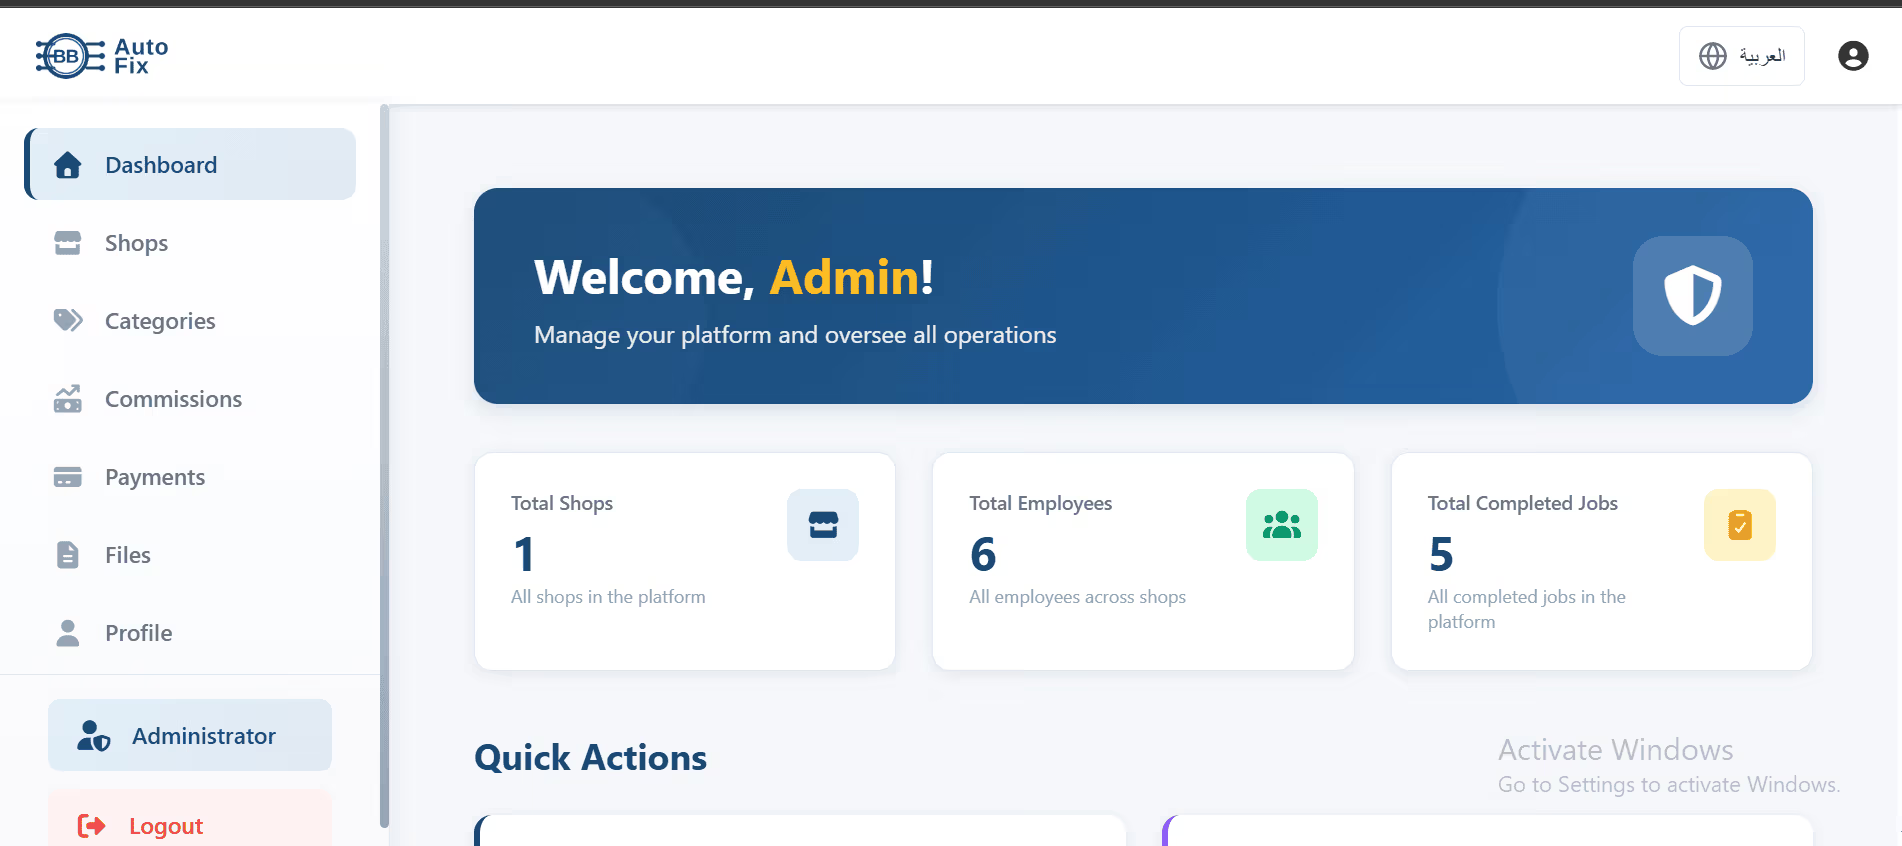
The Admin Dashboard provides a comprehensive overview of the entire BB Auto Fix platform. It's your central hub for monitoring all shops, employees, jobs, and revenue across the system.
💡 Log in with your admin credentials to access the dashboard at /admin/dashboard
Understanding Dashboard Metrics
Total Shops
Shows the total number of auto repair shops registered on your platform. Click to view detailed shop list.
Total Employees
Displays the combined number of technicians and employees across all shops.
Total Completed Jobs
Shows platform-wide completed jobs. Great indicator of platform activity and success.
Quick Actions Available
The dashboard provides quick access buttons to frequently used admin functions:
Manage Shops - Add new shops or edit existing ones
Commission Management - Set rates and track earnings
Payment Tracking - Record shop payments
Manage Categories - Organize service types
📌 Pro Tips:
- • Check the dashboard daily to monitor platform health
- • Watch for shops with pending commission payments
- • Monitor job completion rates to identify successful shops
Shop Management
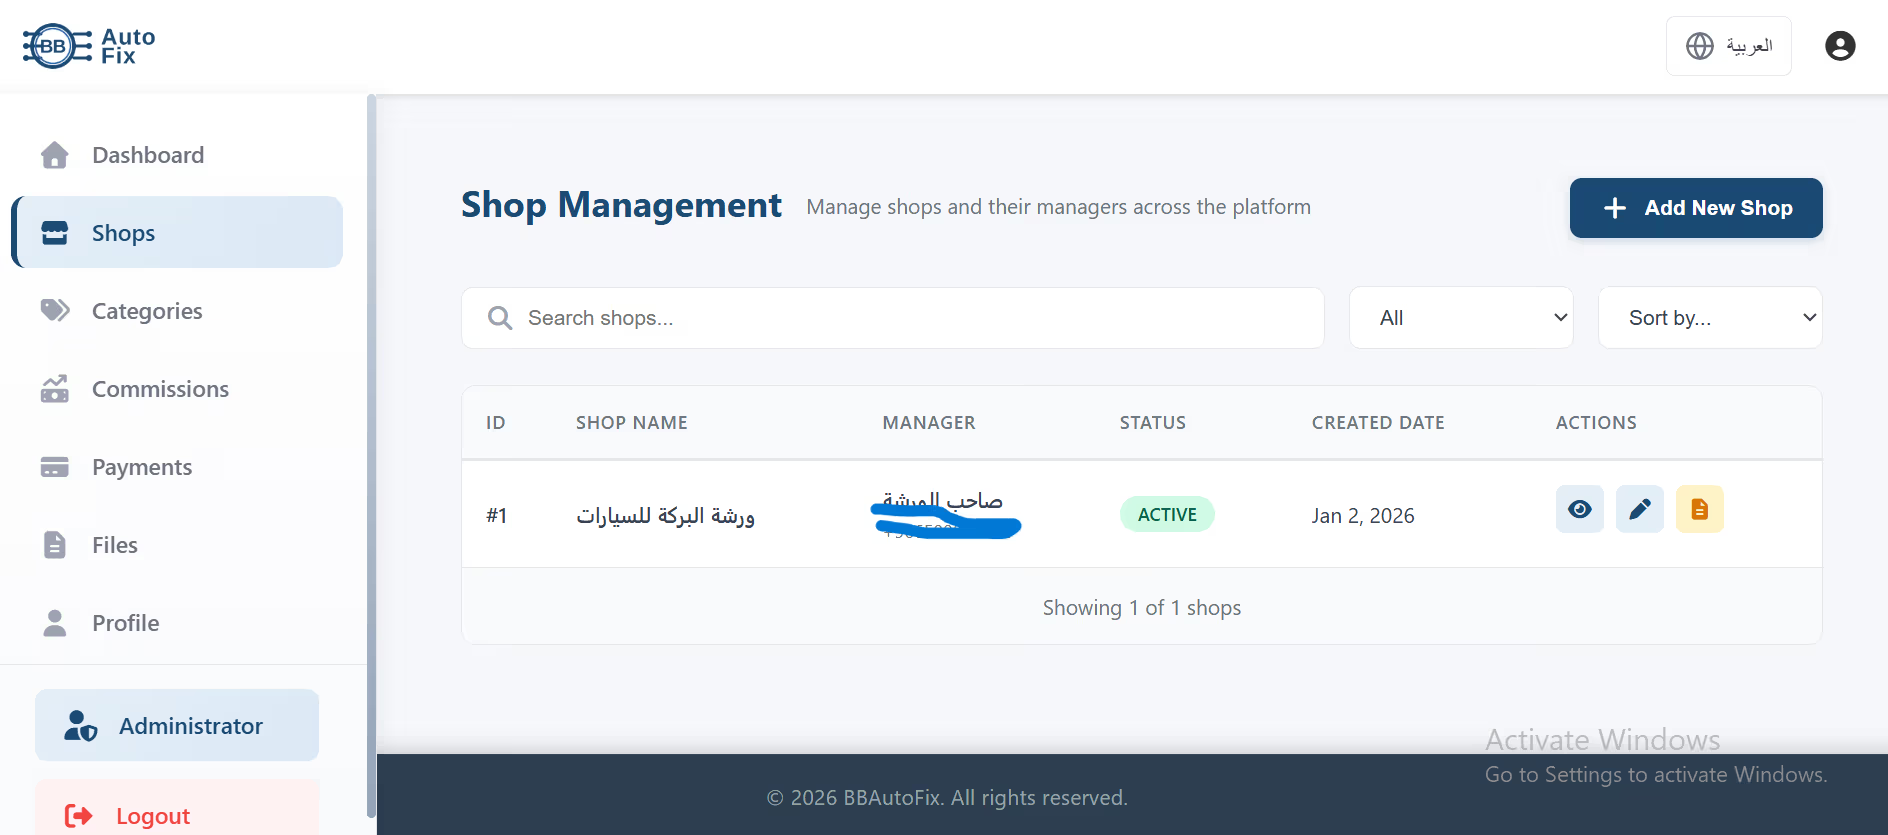
This section allows you to manage all auto repair shops on your platform. You can add new shops, edit existing shop information, activate or deactivate shops, and assign shop managers.
➕How to Add a New Shop
- Click the 'Add New Shop' button in the top right
- Fill in the shop information form:
- - Shop Name (required)
- - Manager Phone
- Click 'Create Shop'
- The shop manager will receive an email with login credentials
✏️How to Edit Shop Information
- Find the shop in the table
- Click the edit icon (pencil) in the Actions column
- Update any necessary information
- Click 'Save Changes'
- The shop will be immediately updated
🔄How to Activate/Deactivate a Shop
You can temporarily deactivate a shop without deleting it. Deactivated shops cannot receive new jobs or access their portal.
- Locate the shop in the table
- Click the three-dot menu in Actions
- Select 'Deactivate' or 'Activate'
- Confirm your action
- The shop status will update immediately
Table Features
Service Category Management
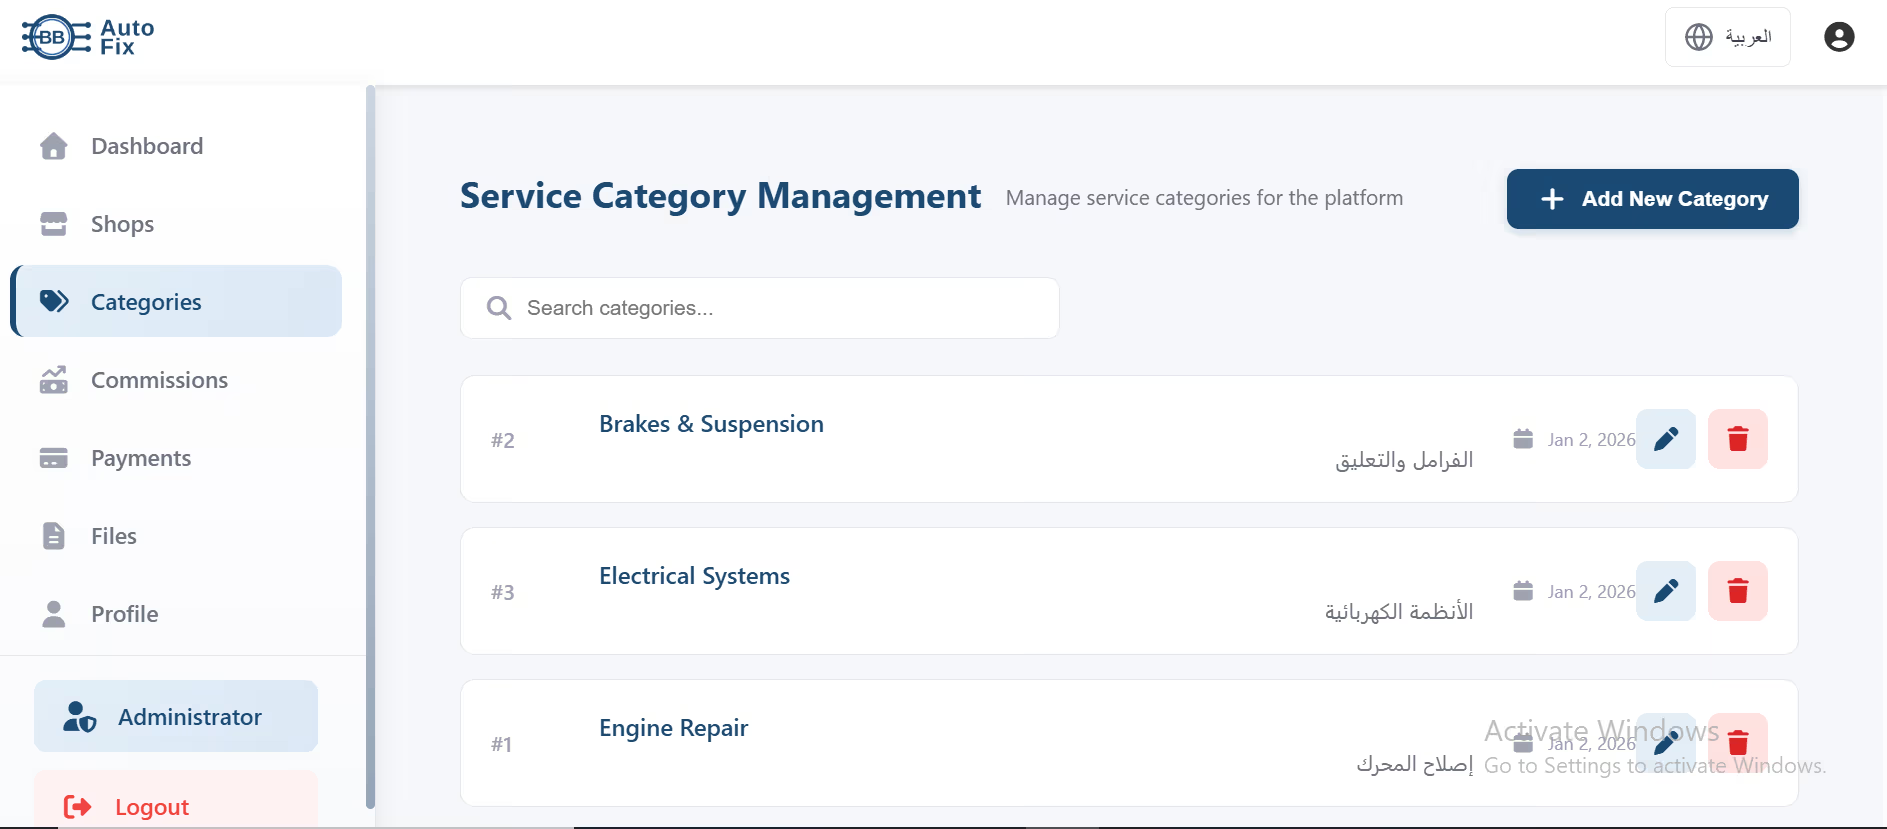
Service categories help organize the types of services offered across all shops (e.g., Engine Repair, Oil Change, Brakes & Suspension, Electrical Systems). This ensures consistency across the platform.
➕ How to Add a Service Category
- Click 'Add New Category' button
- Enter category name in English
- Enter category name in Arabic (for bilingual support)
- Click 'Create Category'
- The category becomes available to all shops
✏️ How to Edit a Category
- Find the category in the list
- Click the edit icon (pencil)
- Update the name
- Click 'Save'
- All shops will see the updated category name
🗑️ How to Delete a Category
⚠️ Warning: Deleting a category will remove it from all shops. Only delete if no shops are using this category.
- Find the category to delete
- Click the delete icon (trash)
- Confirm deletion
- Category is permanently removed
Standard Categories
BB Auto Fix comes with these pre-defined categories:
- •Engine Repair - All engine-related services
- •Oil & Fluids - Oil changes, fluid top-ups, filter replacements
- •Tires & Wheels - Tire rotation, replacement, balancing, alignment
- •Brakes & Suspension - Brake pads, rotors, suspension work
- •Electrical Systems - Battery, alternator, wiring, diagnostics
Commission Management
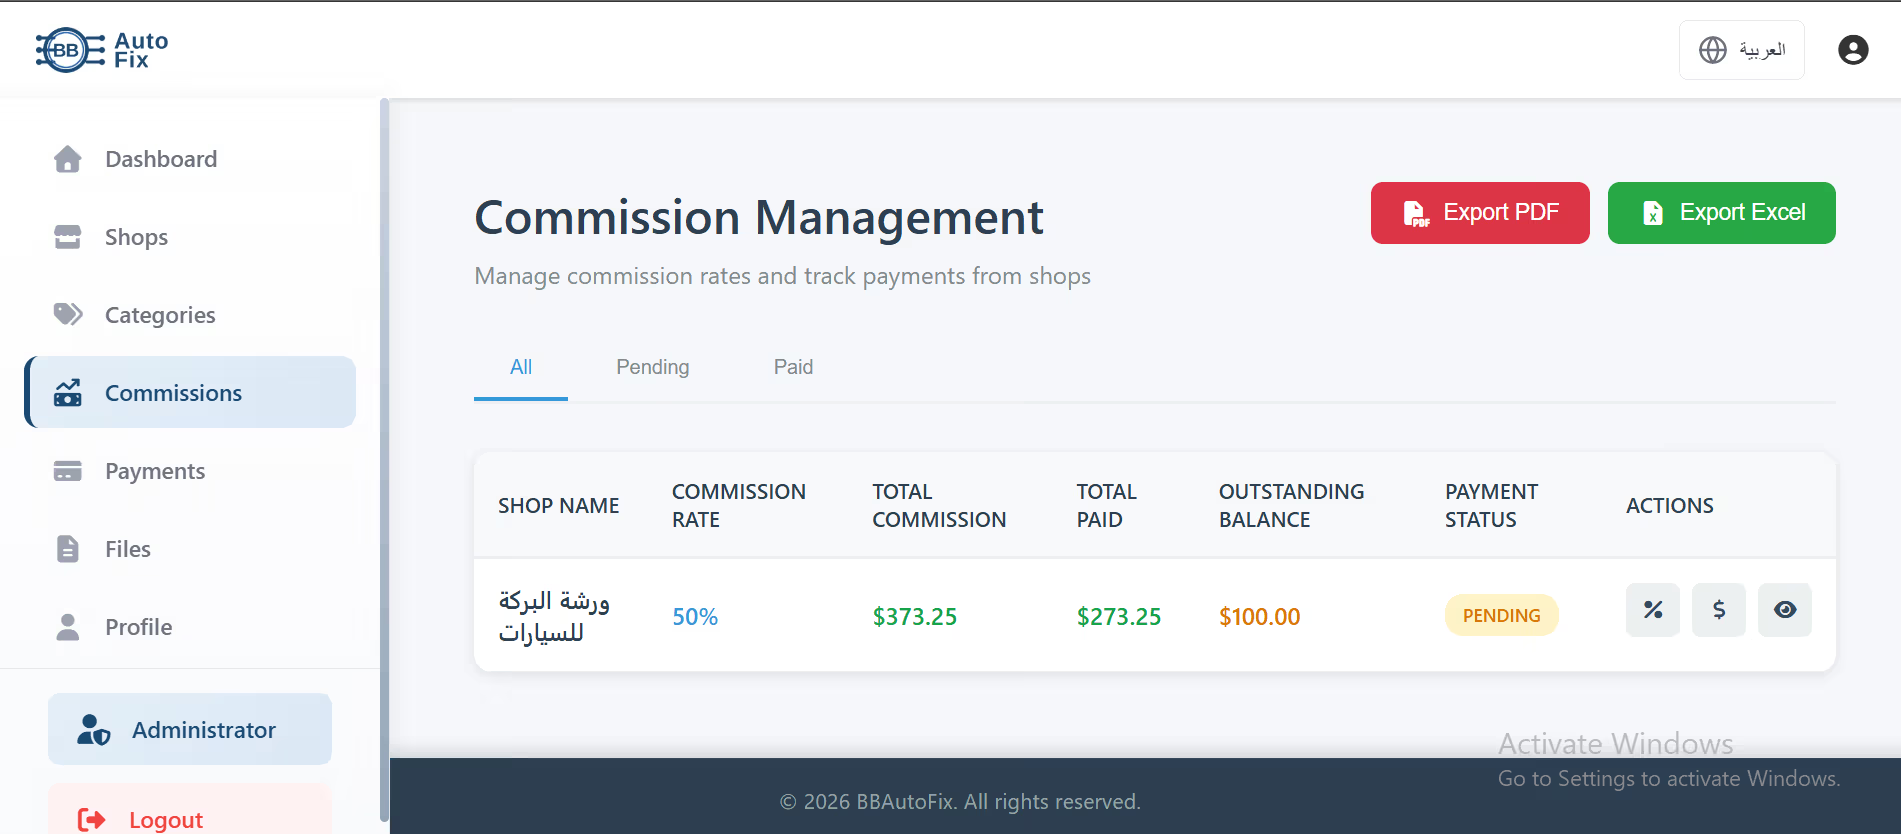
The commission system is how you earn revenue from shops using your platform. You set a commission rate (percentage) for each shop, and the system automatically calculates what they owe based on their completed jobs.
How Commission Works
When a shop completes a job worth $100 and their commission rate is 50%, they owe you $50. The system tracks this automatically.
Commission Owed = (Job Total × Commission Rate) / 100
How to Set Commission Rate
- Go to Shop Management
- When adding or editing a shop, set the Commission Rate field
- Enter a percentage (e.g., 50 for 50%)
- Save the shop
- All future jobs will calculate commission based on this rate
How to View Commission Summary
- Navigate to Commission Management
- See table showing all shops with:
- - Shop Name
- - Commission Rate
- - Total Commission (all-time earnings from this shop)
- - Total Paid (what they've paid you so far)
- - Outstanding Balance (what they still owe)
- - Payment Status (Pending/Paid)
All - Show all shops regardless of payment status
Pending - Show only shops with outstanding balances
Paid - Show only shops that are fully paid up
Export Options
Generate reports for accounting:
Payment Tracking
This is where you record payments received from shops. When a shop pays their monthly commission, you log it here to keep accurate financial records.
How to Record a Payment
- Click 'Record Payment' button
- Select the shop from dropdown
- Enter the payment amount
- Select payment date
- Add payment method (Cash/Bank Transfer/Check)
- Add any notes (e.g., 'January 2026 Commission')
- Click 'Save Payment'
- System updates the shop's outstanding balance automatically
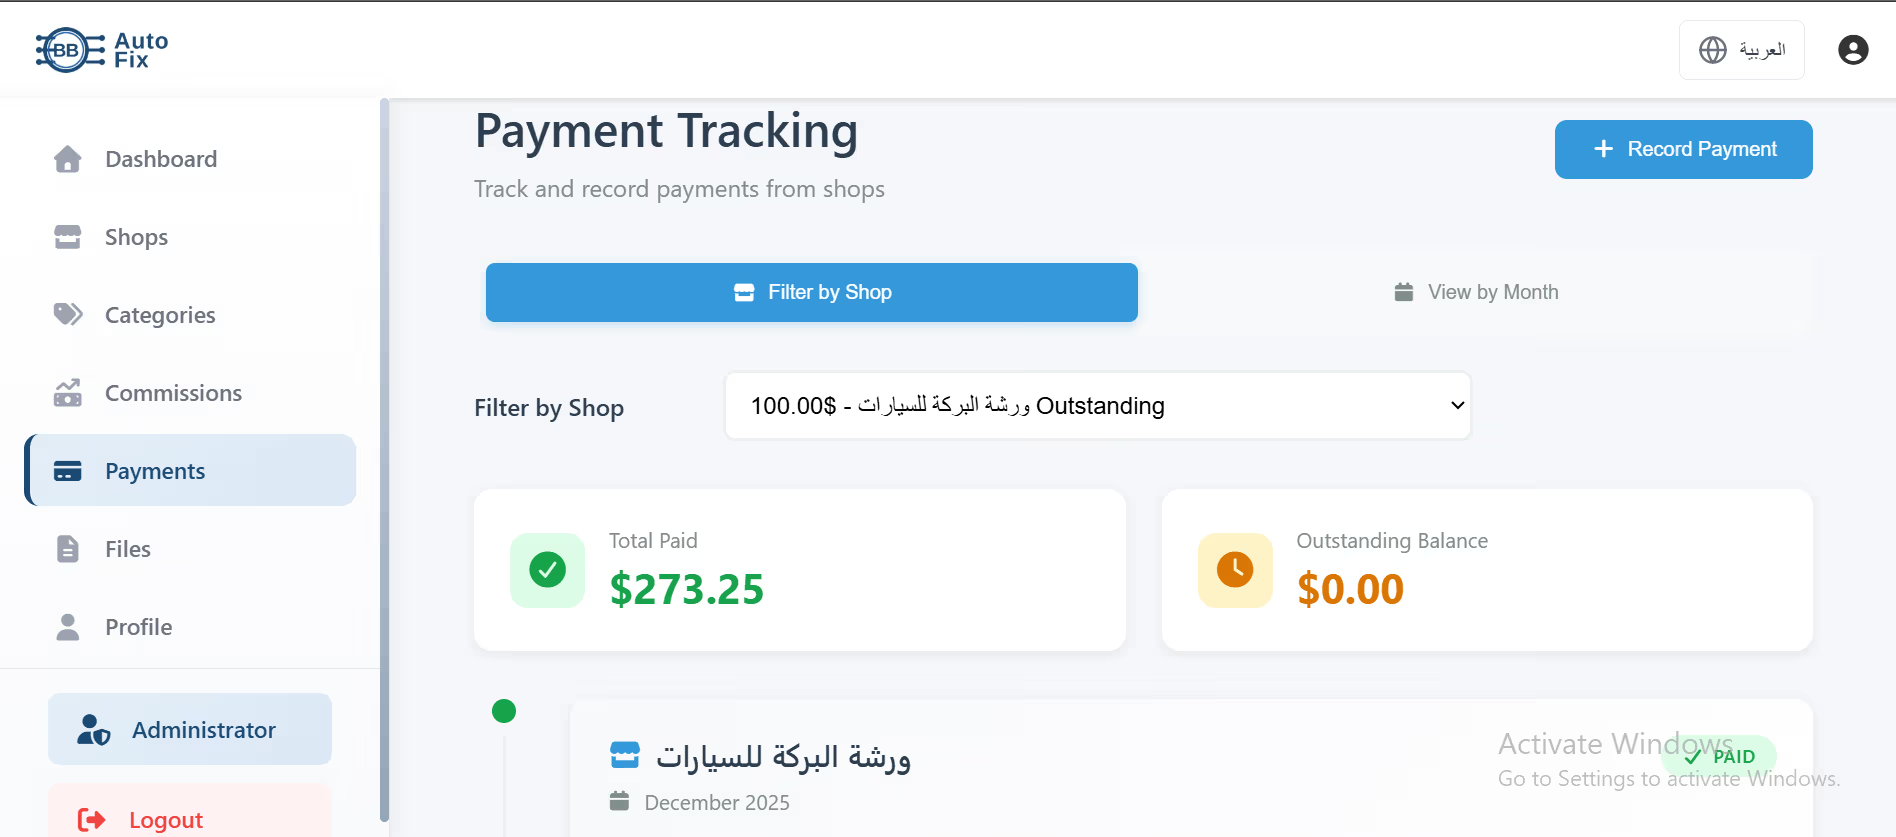
Viewing Payment History
The payment table shows complete payment history:
Filter by Shop
Select a specific shop from the dropdown to see only their payment history.
View by Month
Switch to monthly view to see all shop payments for a specific month.
Downloading Payment Receipts
- Find the payment in the table
- Click 'Download Receipt' button
- A PDF receipt is generated with:
- - Payment date and amount
- - Shop information
- - Period covered
- - Payment method
- - Receipt number
Shop Documents Management
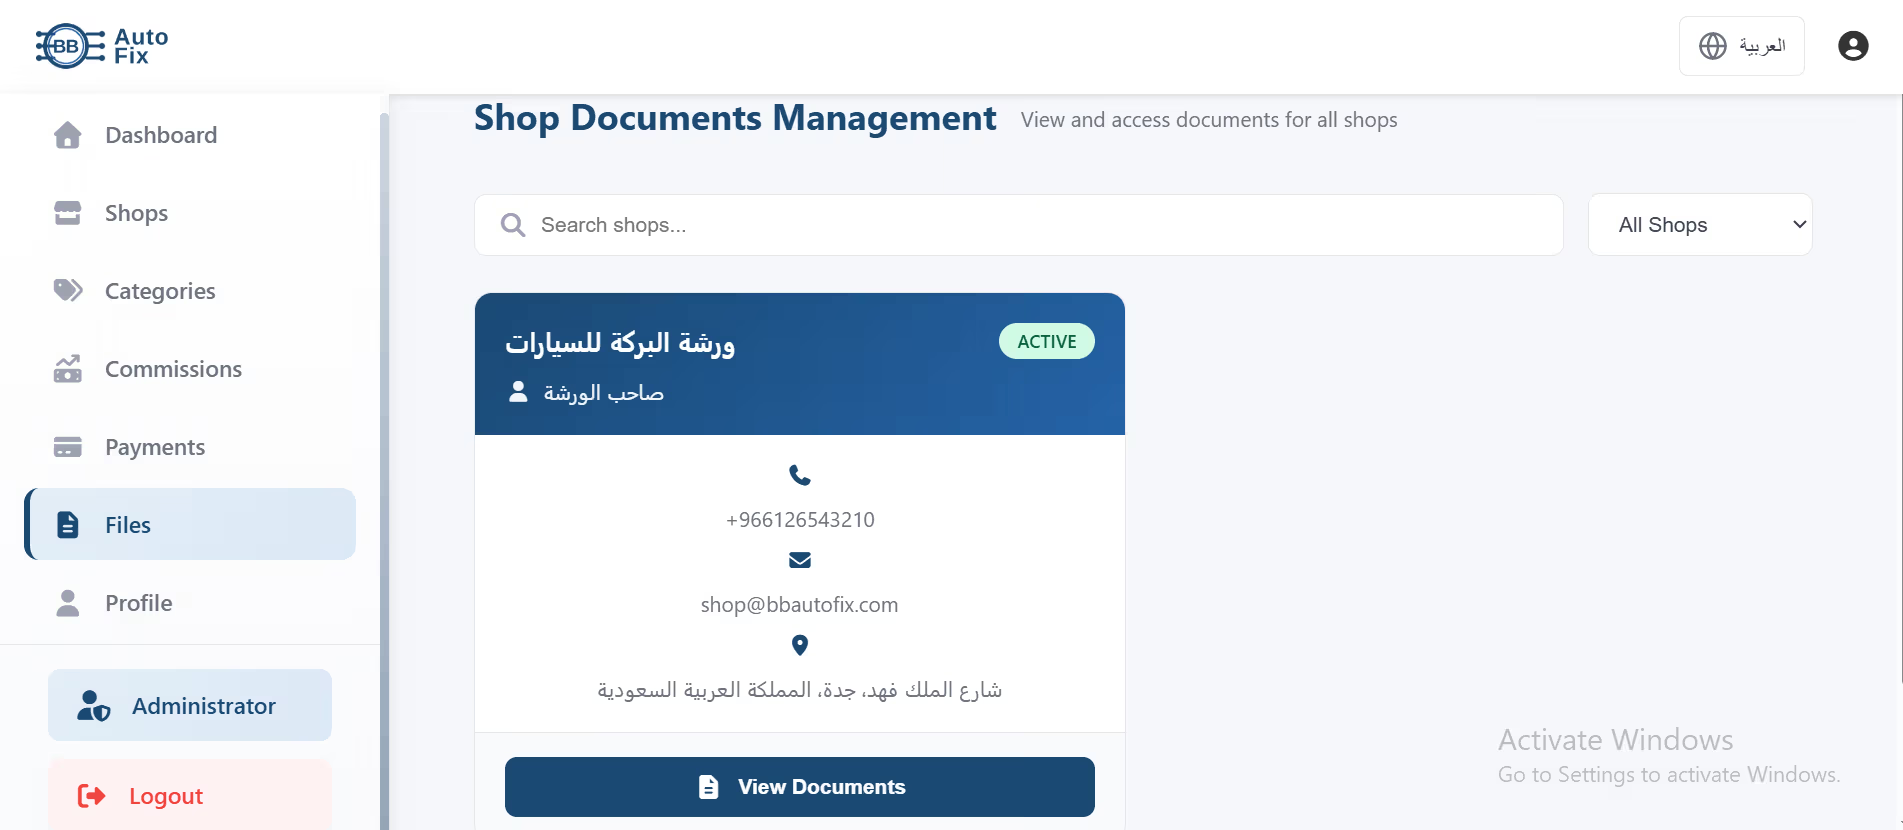
Access and view all documents uploaded by shops. This includes business licenses, insurance certificates, technician certifications, and other compliance documents.
How to Access Shop Documents
- Navigate to Documents Management
- See a card for each shop
- Each card shows:
- - Shop name and logo
- - Shop owner name
- - Contact information
- - Shop address
- - 'View Documents' button
- Click 'View Documents' to see all uploaded files
🔍 Searching for Shops
Use the search box to quickly find a shop by name, owner, or location.
🔽 Filtering Shops
Use the 'All Shops' dropdown to filter by status (Active/Inactive).
👁️ Viewing Documents
When you click 'View Documents', you'll see:
Common Document Types
Admin Profile
Manage your personal administrator account information and settings.
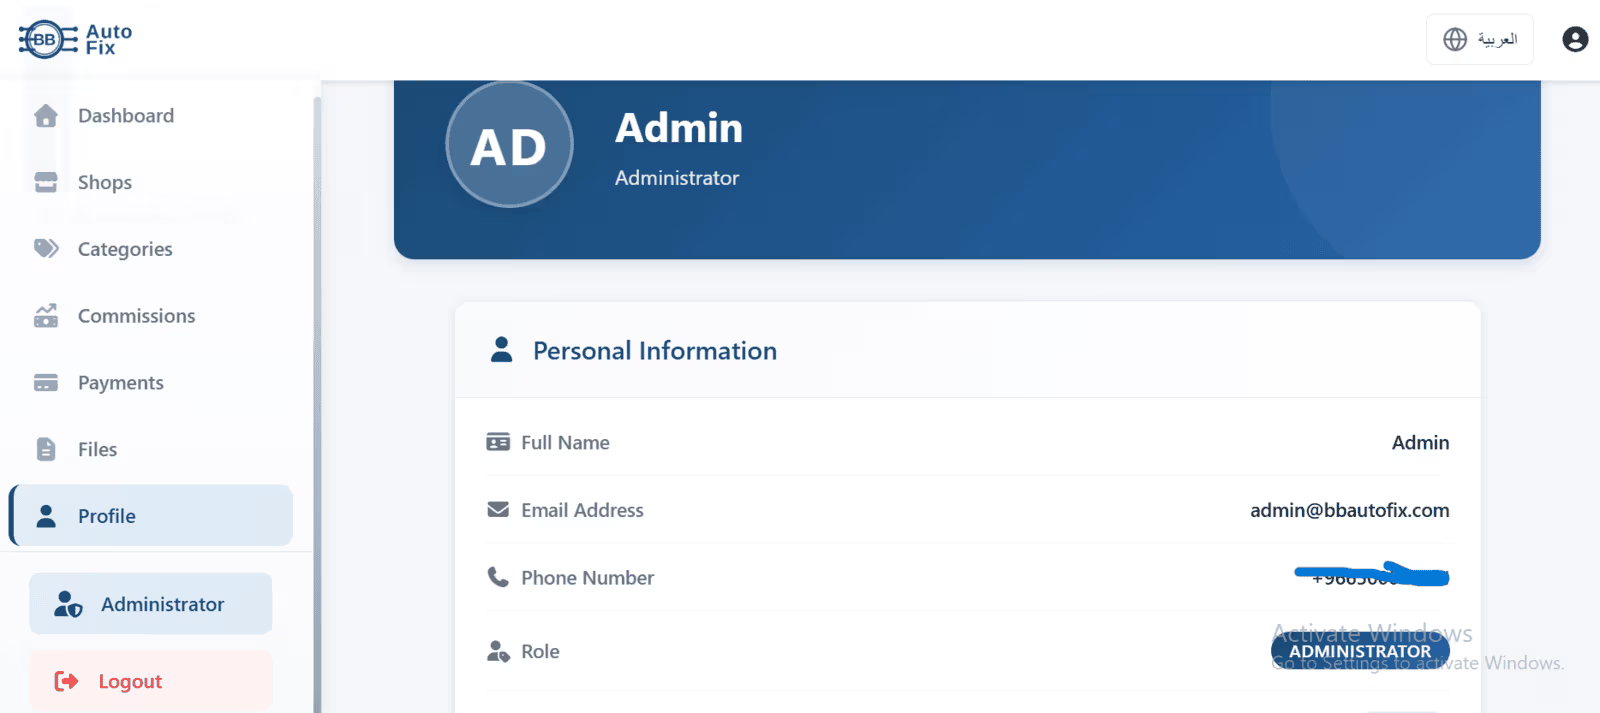
What You Can Edit
- • Full Name - Your display name
- • Email Address - Login email and contact
- • Phone Number - Contact number
- • Password - Update your login password
How to Update Your Profile
- Click 'Edit Profile' button
- Update the fields you want to change
- Click 'Save Changes'
- Your profile is updated immediately
🔒 How to Change Password
- Click 'Edit Profile'
- Scroll to Password section
- Enter current password
- Enter new password
- Confirm new password
- Click 'Update Password'
- You'll be logged out and need to log in with new password
Shop Dashboard
Your shop dashboard is mission control for your auto repair business. It gives you a real-time snapshot of all jobs, employees, revenue, and operations.
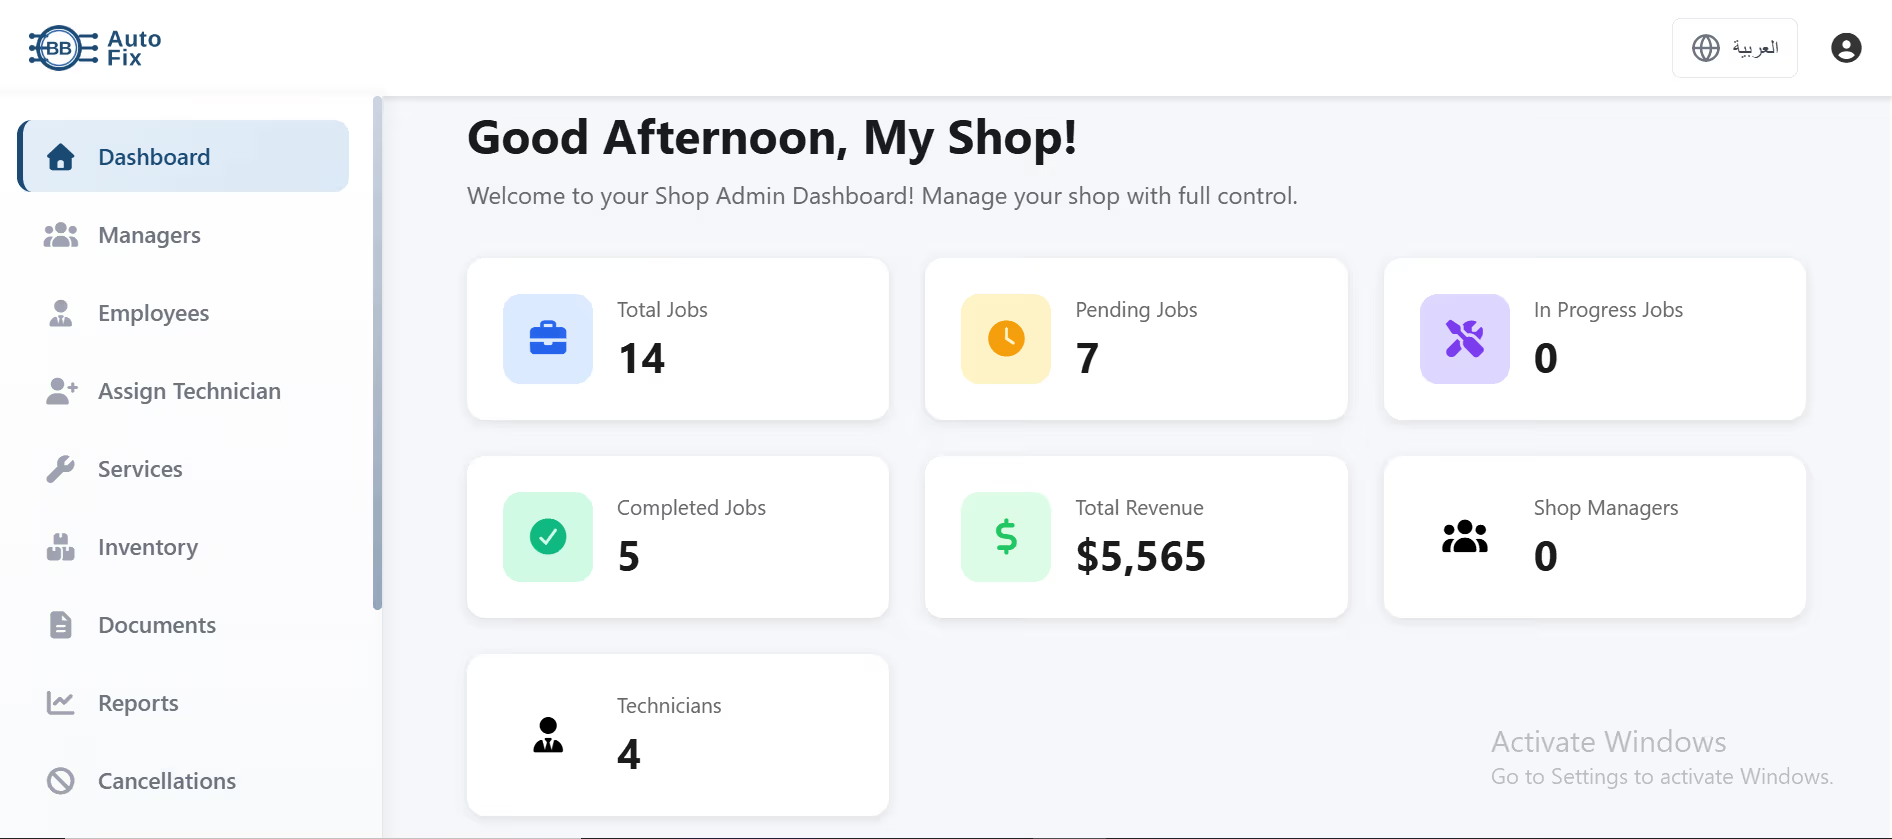
Understanding Your Dashboard Metrics
Total Jobs
All jobs (pending + in progress + completed)
Pending Jobs
Jobs waiting for technician assignment
In Progress
Jobs currently being worked on
Completed Jobs
Finished jobs
Total Revenue
All-time earnings from completed jobs
Shop Managers
Number of managers you've added
Technicians
Number of technicians/employees
Quick Actions Explained
These buttons provide fast access to common daily tasks:
Manage Managers - Add or remove shop managers
Manage Employees - Add technicians, update skills
Manage Services - Update your service catalog and prices
Manage Inventory - Check parts stock, add items
View Reports - See revenue, job analytics
Payment History - Check commission payment status
Cancellation Requests - Handle customer cancellations
Shop Settings - Update shop profile and preferences
Shop Managers
If you have a larger shop, you can add additional managers to help run operations. They'll have the same access to the shop portal as you do.
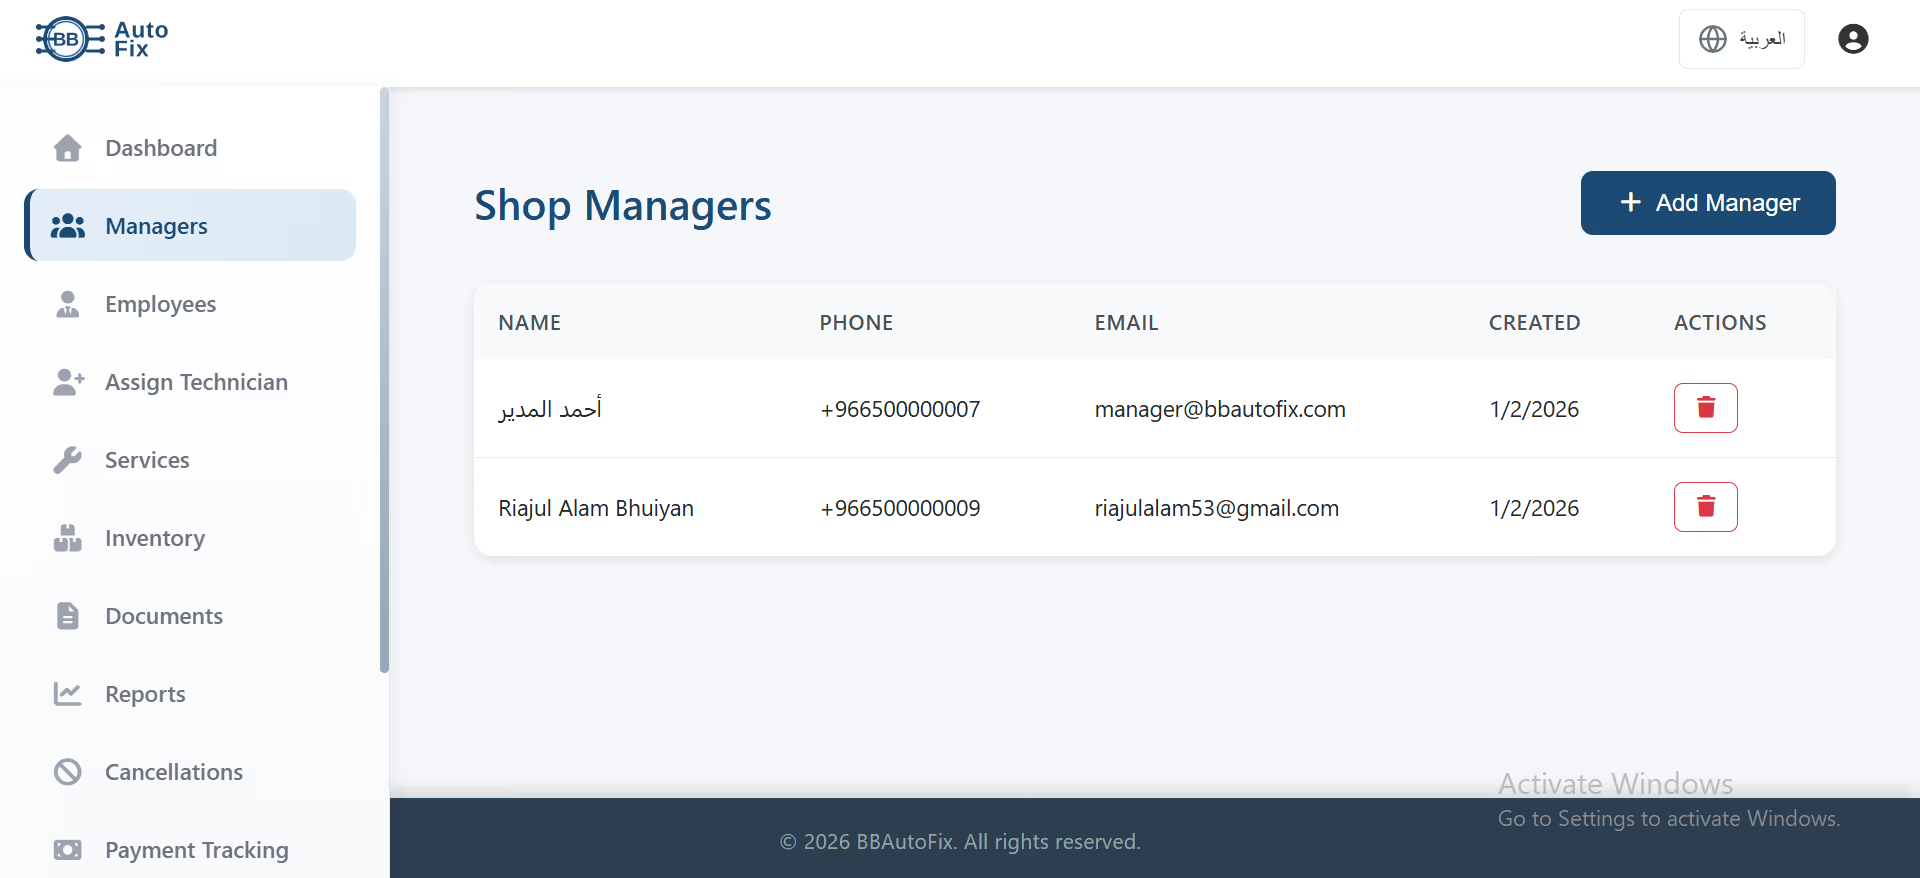
How to Add a Shop Manager
- Click 'Add Manager' button
- Fill in manager details:
- - Full Name
- - Email (they'll use this to log in)
- - Phone Number
- Click 'Create Manager'
- They'll receive an email with login credentials
- They can now access the shop portal
How to Remove a Manager
- Find the manager in the table
- Click the delete icon (trash)
- Confirm removal
- Their access is immediately revoked
What Can Managers Do?
Shop managers have full access to all shop features including assigning jobs, managing employees, viewing reports, and handling customer requests.
Employee Management
This is where you manage your technicians and service employees. You can add new employees, update their specializations, track their performance, and manage their status.
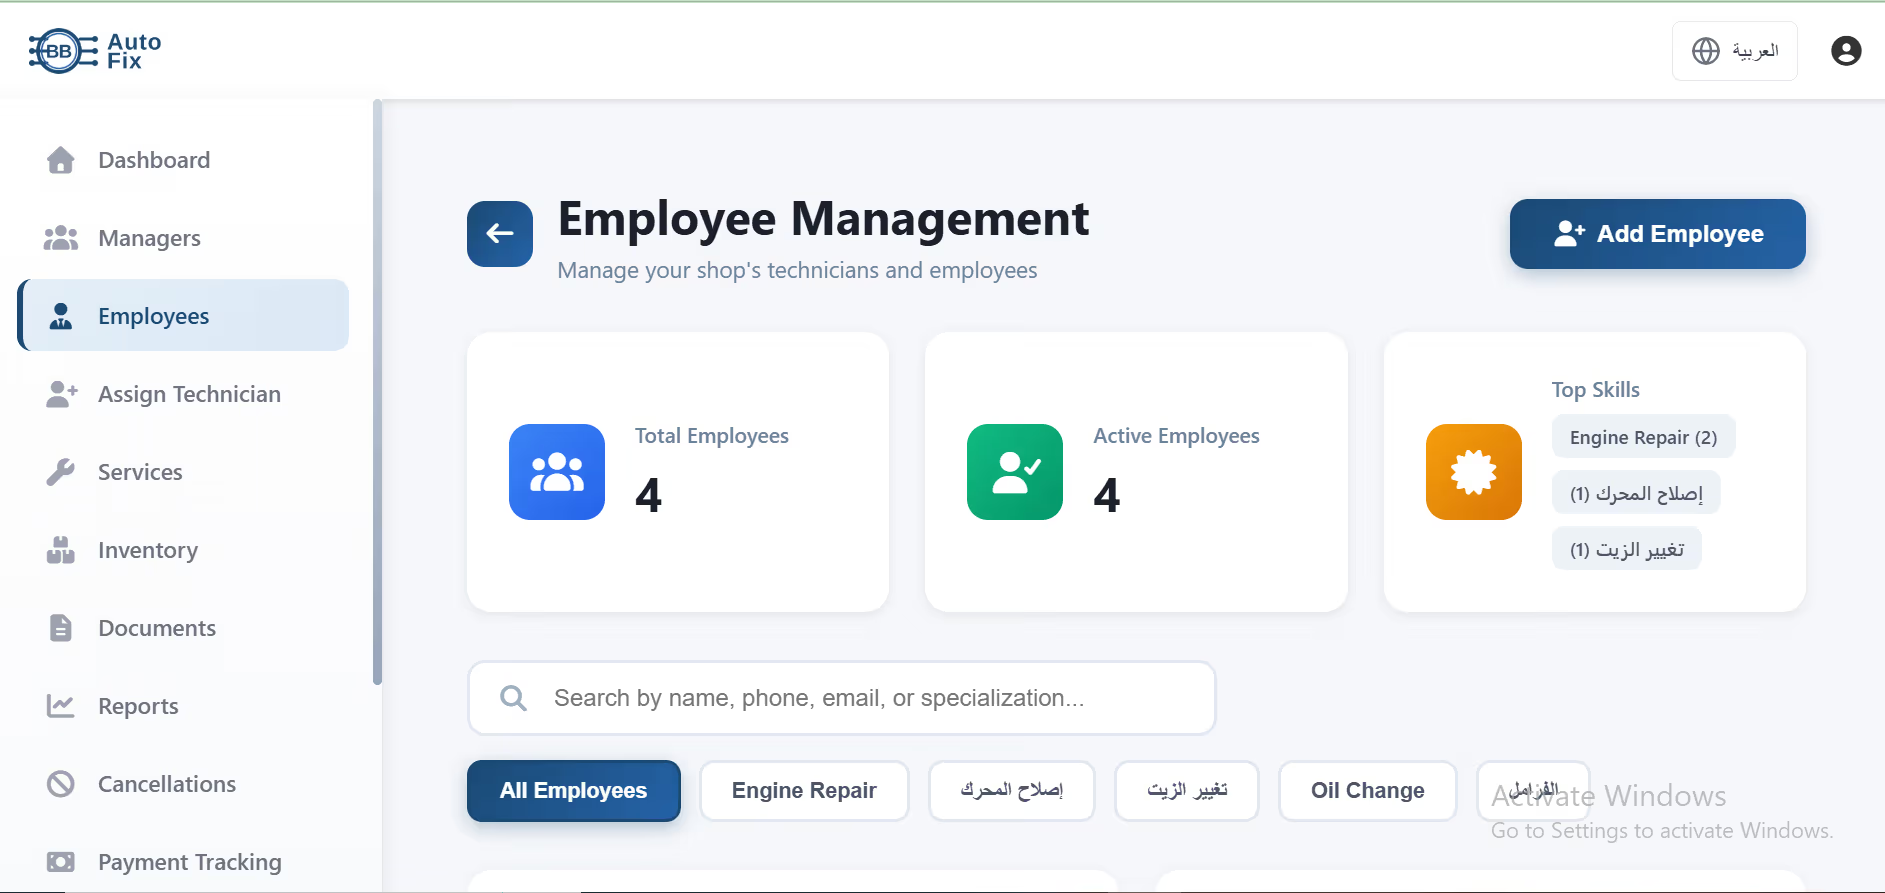
How to Add a New Employee/Technician
- Click 'Add Employee' button
- Fill in employee information:
- - Full Name (required)
- - Email Address (required, unique)
- - Phone Number (required)
- - Address
- - Specializations - Select all that apply:
- • Engine Repair
- • Oil Change
- • Tire Rotation & Alignment
- • Brake Service
- • Electrical Systems
- • Suspension
- • Diagnostics
- Click 'Add Employee'
- They'll receive login credentials via email
Total Employees
All employees you've hired
Active Employees
Currently working/available employees
Top Skills
Most common specializations among your team
Understanding Specializations
Specializations help you assign the right technician to each job. For example, if a job requires brake service, the system will show you which technicians have brake service specialization.
This ensures quality work and efficient job assignment.
Search and Filter Employees
Search by name, phone, email, or specialization
Filter by specialization to find technicians with specific skills
How to Edit Employee Information
- Find the employee in the list
- Click the 'Edit' button
- Update information as needed
- Add or remove specializations
- Click 'Save Changes'
How to Deactivate an Employee
If an employee leaves but you want to keep their records:
- Click Edit on the employee
- Toggle 'Active Status' to OFF
- Save changes
- They can no longer log in or receive jobs
Assign Technician to Jobs
This is one of your most important daily tasks. When customers book services, jobs appear as 'Pending' until you assign a technician. This screen helps you match jobs with the right technician.
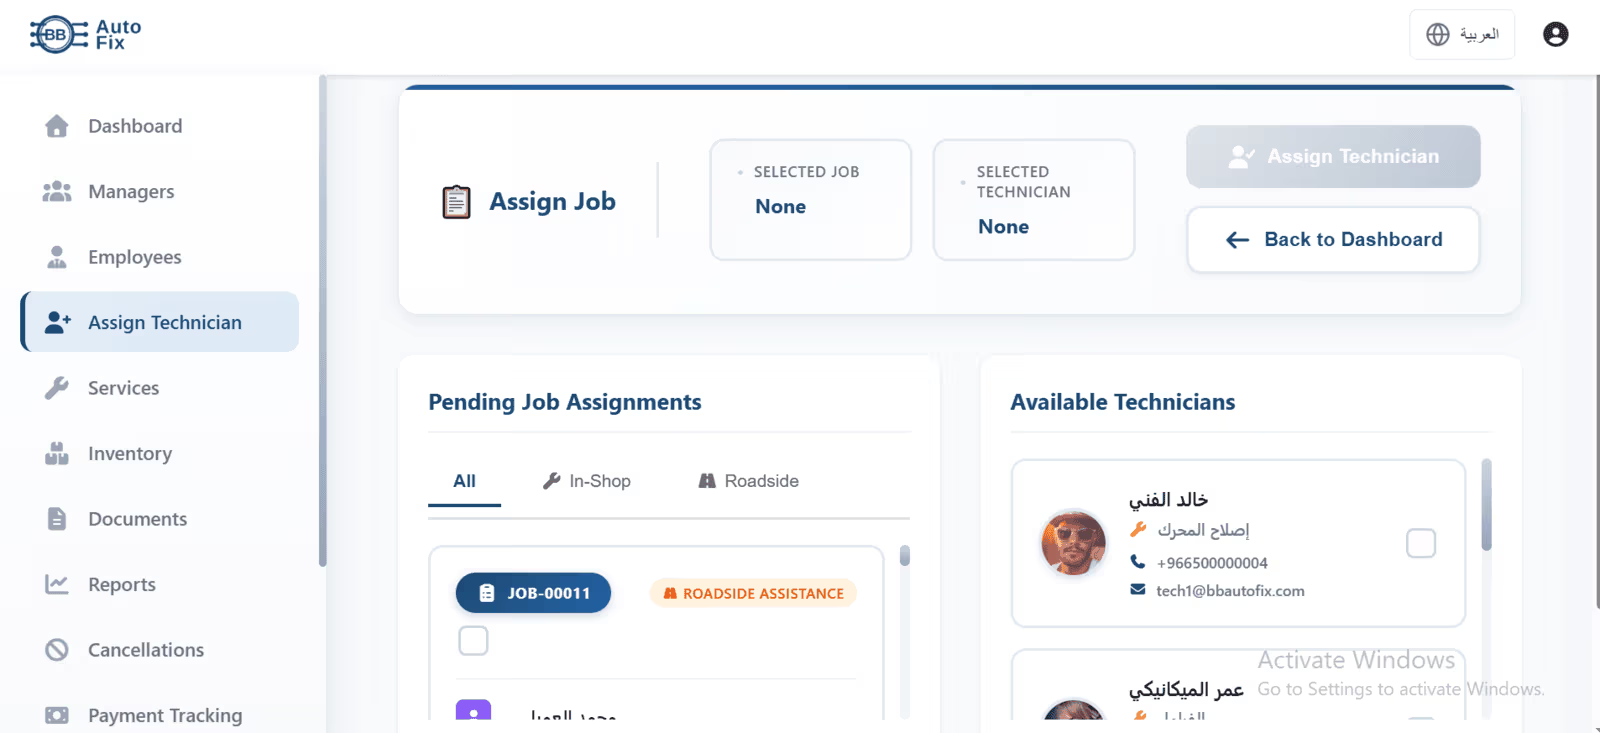
How to Assign a Job to a Technician
- View the 'Pending Job Assignments' section
- See all unassigned jobs with:
- - Job ID
- - Customer name
- - Vehicle details (make, model, year)
- - Service type (Oil Change, Brake Service, etc.)
- - Job type (In-Shop or Roadside Assistance)
- Click on a job to select it
- View 'Available Technicians' on the right
- See which technicians have the right specialization
- Click on a technician to select them
- Click 'Assign Technician' button
- Job is immediately assigned and technician receives notification
In-Shop Service
Customer brings vehicle to your shop. Technician works on-site.
Roadside Assistance
Customer needs help at their location (breakdown, flat tire, etc.). Click 'View Location' to see map and get directions.
Filtering Jobs
All - Show all pending jobs
In-Shop - Show only in-shop jobs
Roadside - Show only roadside assistance jobs
Best Practices for Job Assignment
- •Match technician specialization to job type for best results
- •Check technician's current workload before assigning
- •For urgent jobs, assign your most experienced technician
- •For roadside assistance, assign technicians who are mobile-ready
- •Assign jobs as soon as they come in to reduce customer wait time
Service Management
Your service catalog is what customers see when booking. Here you define all the services your shop offers, set prices, estimated duration, and descriptions.
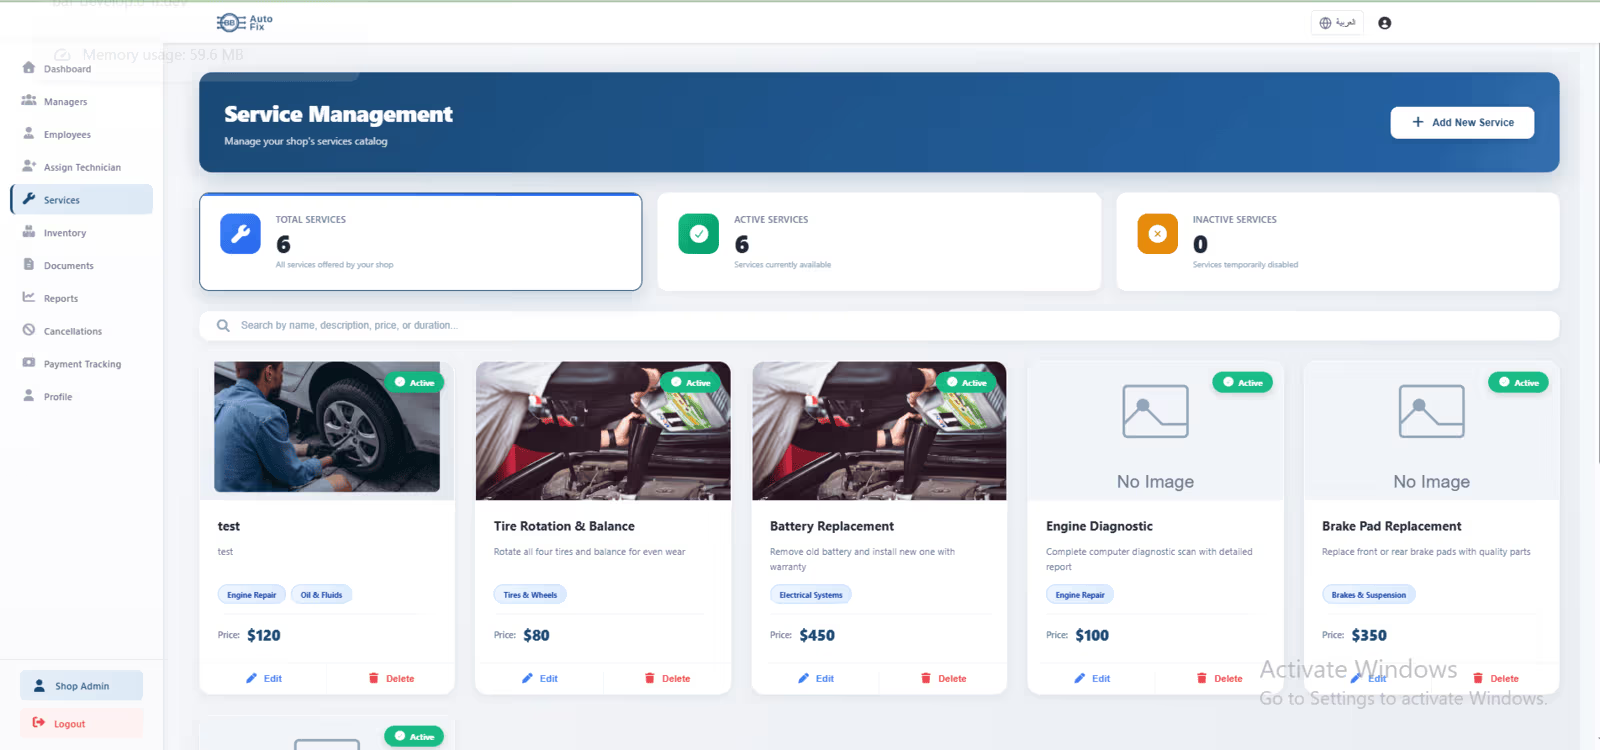
How to Add a New Service
- Click 'Add New Service' button
- Fill in service details:
- - Service Name (e.g., 'Full Oil Change')
- - Category (select from dropdown: Engine Repair, Oil & Fluids, etc.)
- - Description (what's included)
- - Price (in your currency)
- - Estimated Duration (e.g., '30 minutes', '2 hours')
- - Upload service image (optional but recommended)
- Toggle 'Active' status to ON
- Click 'Create Service'
- Service is now available for customer booking
Total Services
All services in your catalog
Active Services
Services customers can book
Inactive Services
Temporarily unavailable services
How to Edit Service Details
- Find the service in the list
- Click the 'Edit' icon
- Update any field (price, duration, description, etc.)
- Click 'Save Changes'
- Changes appear immediately on customer booking page
How to Temporarily Deactivate a Service
If you can't offer a service temporarily (parts shortage, equipment down):
- Click Edit on the service
- Toggle 'Active' status to OFF
- Save changes
- Service is hidden from customers (but you can reactivate anytime)
Pricing Tips
- •Research competitor pricing in your area
- •Consider parts cost + labor + overhead
- •Offer package deals (e.g., 'Oil Change + Tire Rotation' bundle)
- •Update prices seasonally if needed
- •Be transparent about what's included
Inventory Management
Track all your auto parts, fluids, and supplies. The inventory system helps you know what you have in stock, when to reorder, and prevents running out of critical items.
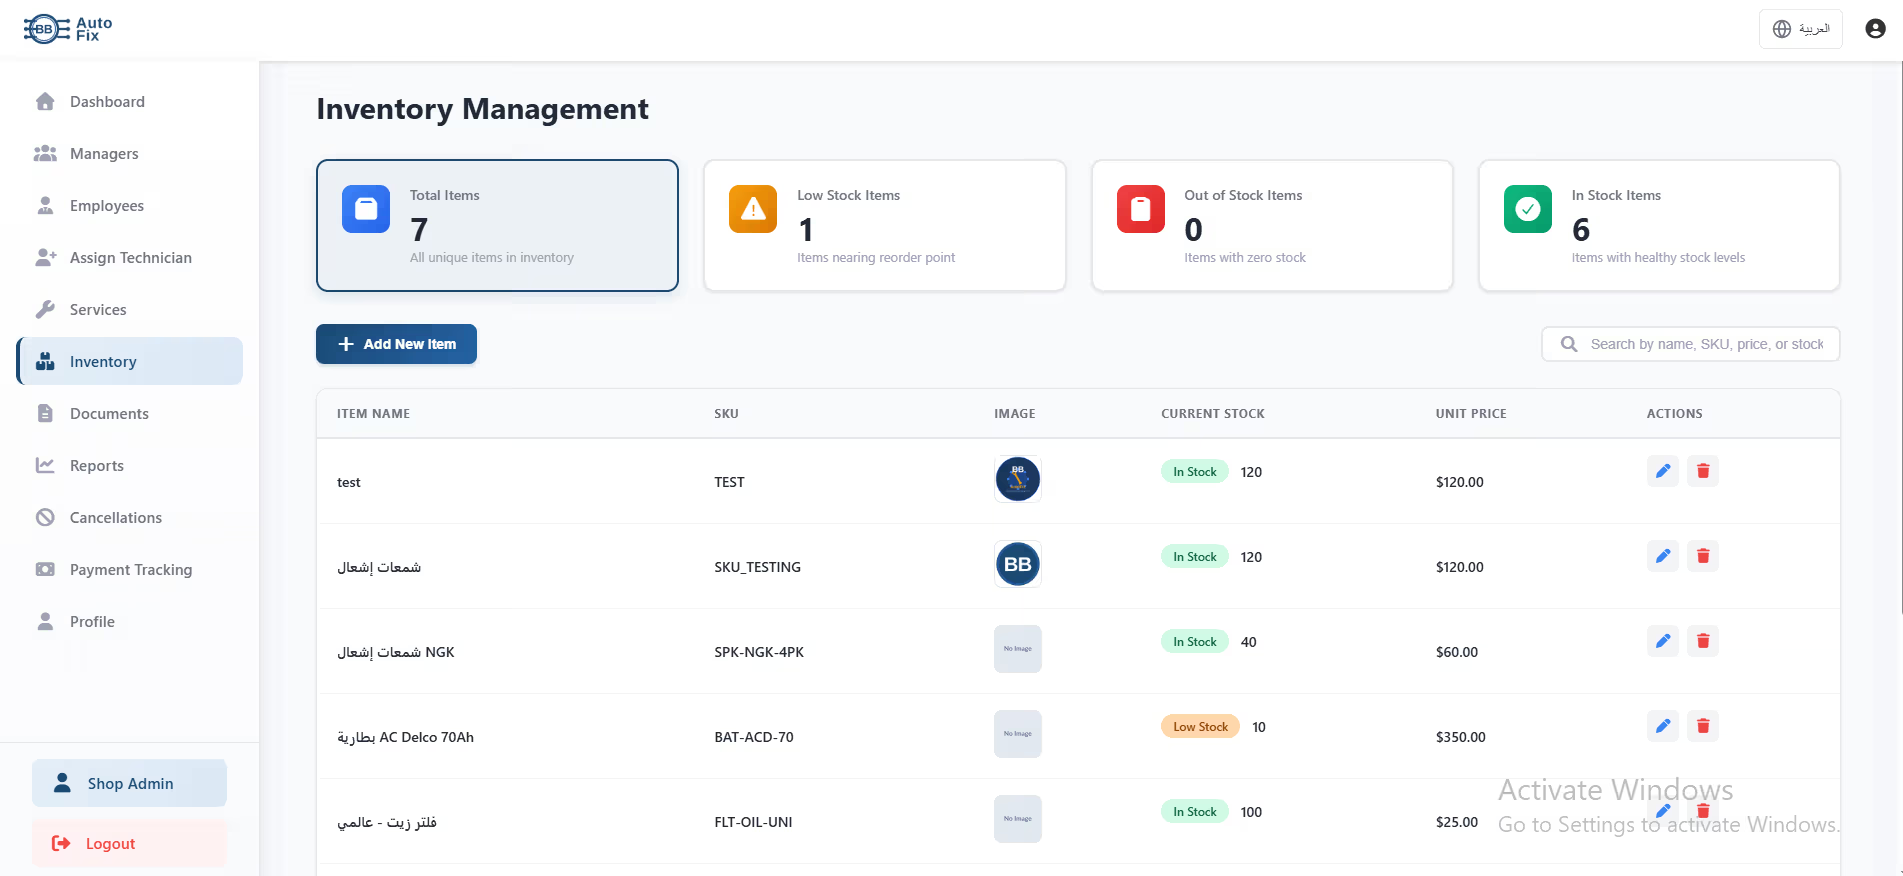
How to Add an Inventory Item
- Click 'Add New Item' button
- Fill in item details:
- - Item Name (e.g., 'Castrol 5W-30 Motor Oil')
- - SKU (Stock Keeping Unit - your internal code)
- - Category (Oil, Filters, Brake Parts, Tires, etc.)
- - Current Stock Quantity
- - Reorder Point (quantity that triggers low stock alert)
- - Unit Price (cost per item)
- - Upload item image
- Click 'Add Item'
- Item is now in your inventory
Total Items
Total unique items in inventory
Low Stock Items
Items at or below reorder point (need to order soon)
Out of Stock
Items with zero quantity (order immediately)
In Stock
Items with healthy stock levels
Stock Status Indicators
Green badge = In Stock (above reorder point)
Yellow badge = Low Stock (at or below reorder point)
Red badge = Out of Stock (zero quantity)
How to Update Stock Quantity
- Find the item in the table
- Click the edit icon
- Update 'Current Stock' field
- - Add to stock when new shipment arrives
- - Subtract from stock when used for jobs
- Click 'Save'
- Stock level updates and status badge changes if needed
Setting Up Reorder Alerts
The 'Reorder Point' field determines when an item shows as 'Low Stock'.
If you set reorder point to 10, when quantity drops to 10 or below, you'll get a low stock warning.
Set reorder points based on how quickly you use the item and how long it takes to get more.
Inventory Best Practices
- •Do weekly stock counts to keep quantities accurate
- •Set reorder points to avoid running out during busy periods
- •Keep commonly used items (oil, filters) well stocked
- •Track which items are used most frequently
- •Order in bulk for frequently used items to save money
Shop Documents
Store all your important business documents securely in the cloud. This includes licenses, insurance, certifications, and other compliance documents. You can upload up to 15 documents.
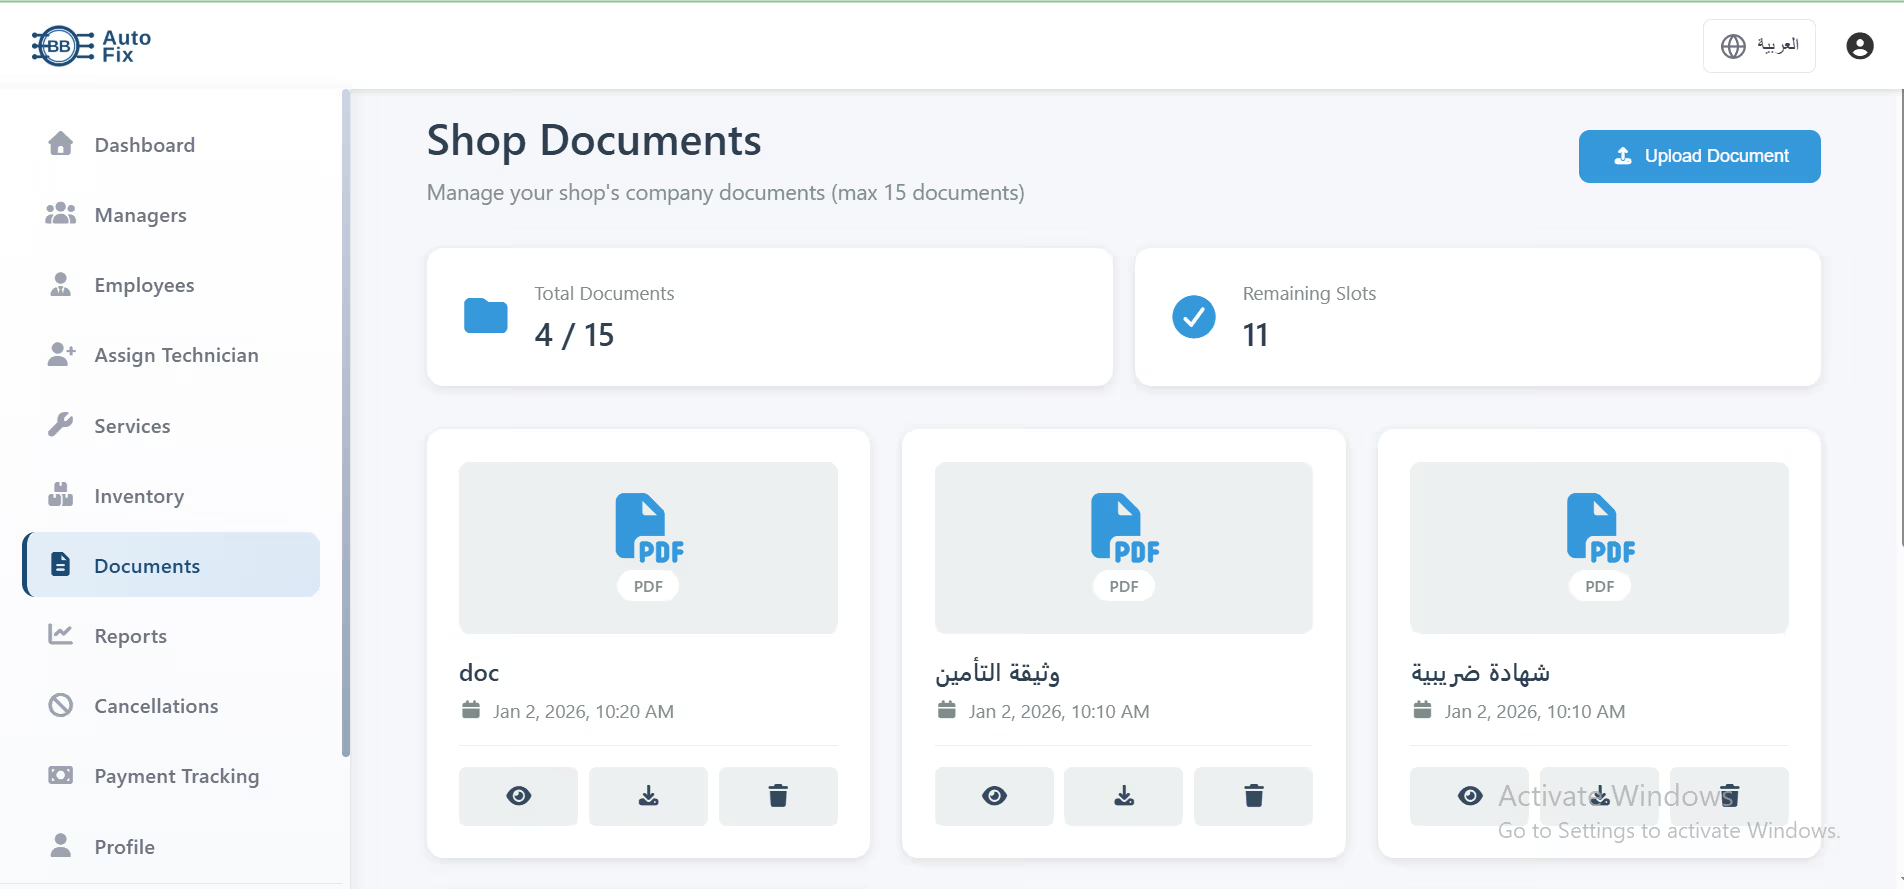
How to Upload a Document
- Click 'Upload Document' button
- Choose file from your computer
- Supported formats: PDF, JPG, PNG, DOC, DOCX
- Maximum file size: 10MB per document
- Add a document title/description
- Click 'Upload'
- Document is stored and visible to admin
Total Documents
Shows X / 15 (current/maximum)
Remaining Slots
How many more documents you can upload
Document Actions
View - Opens document in browser for quick preview
Download - Saves copy to your computer
Delete - Permanently removes document (frees up a slot)
Recommended Documents to Upload
Document Security
All documents are:
- ✓Encrypted in transit and at rest
- ✓Stored on secure cloud servers
- ✓Accessible only to you and platform admin
- ✓Backed up automatically
- ✓Never shared with third parties
Shop Reports & Analytics
Comprehensive reporting system to analyze your shop's performance, revenue trends, job completion rates, and technician productivity.
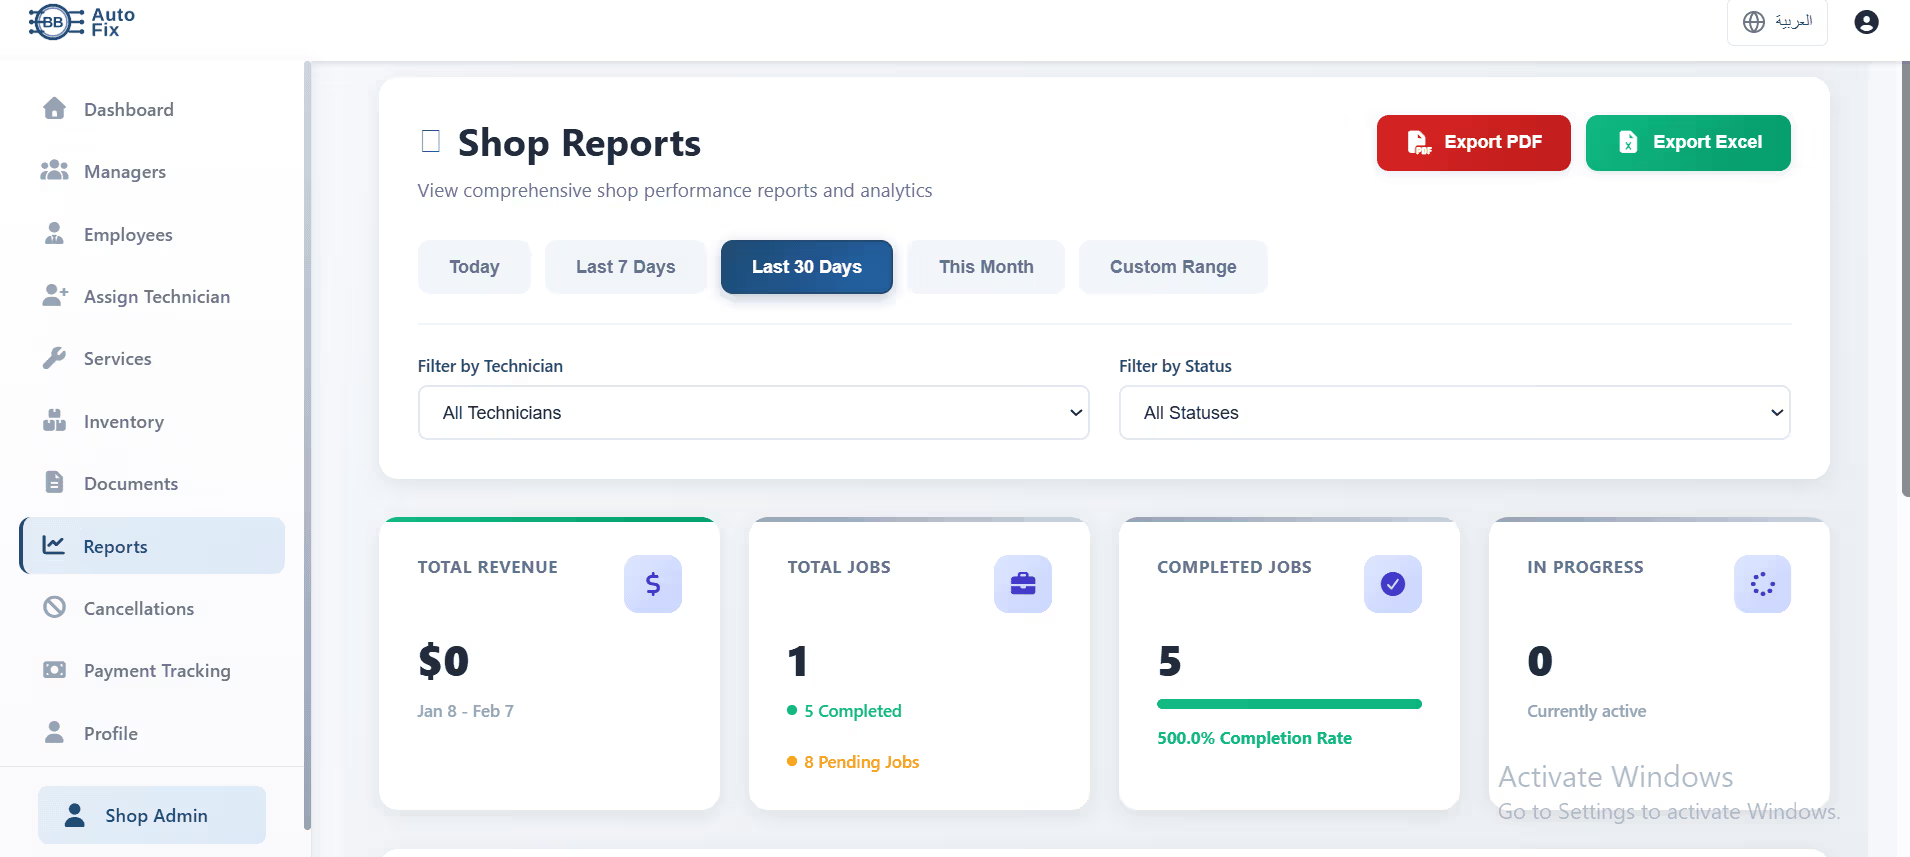
How to Generate a Report
- Select time period:
- - Today
- - Last 7 Days
- - Last 30 Days
- - This Month
- - Custom Range (pick specific dates)
- Apply filters (optional):
- - Filter by Technician
- - Filter by Status (Completed/In Progress/Pending)
- View metrics that appear:
- - Total Revenue
- - Total Jobs
- - Completed Jobs
- - Completion Rate %
- - In Progress Jobs
- View charts:
- - Daily Revenue chart (line graph)
- - Revenue trends over time
- Export report:
- - Click 'Export PDF' for printable report
- - Click 'Export Excel' for spreadsheet analysis
Total Revenue
Total Jobs
Completed Jobs
Completion Rate
In Progress
Reading the Daily Revenue Chart
The line graph shows revenue trends over time:
- • Upward trend = Revenue growing (good!)
- • Downward trend = Revenue declining (investigate why)
- • Flat line = Consistent revenue
- • Spikes = Busy days with high-value jobs
- • Dips = Slow days (normal for some businesses)
Filtering by Technician
Select a specific technician to see:
- • How many jobs they completed
- • Revenue they generated
- • Their completion rate
- • Their productivity trends
Use this to identify top performers or technicians who need training.
Using Custom Date Ranges
Great for:
- • Comparing this month vs last month
- • Analyzing seasonal trends (summer vs winter)
- • Preparing monthly financial reports
- • Tracking performance during promotions
Exporting Reports
📄 PDF Export
Perfect for: Sharing with partners, Printing for records, Professional presentations
📊 Excel Export
Perfect for: Detailed analysis, Creating charts, Financial calculations, Combining with other data
Cancellation Requests Management
When customers need to cancel their booked service, their request appears here. You can review the details and either approve or reject the cancellation.
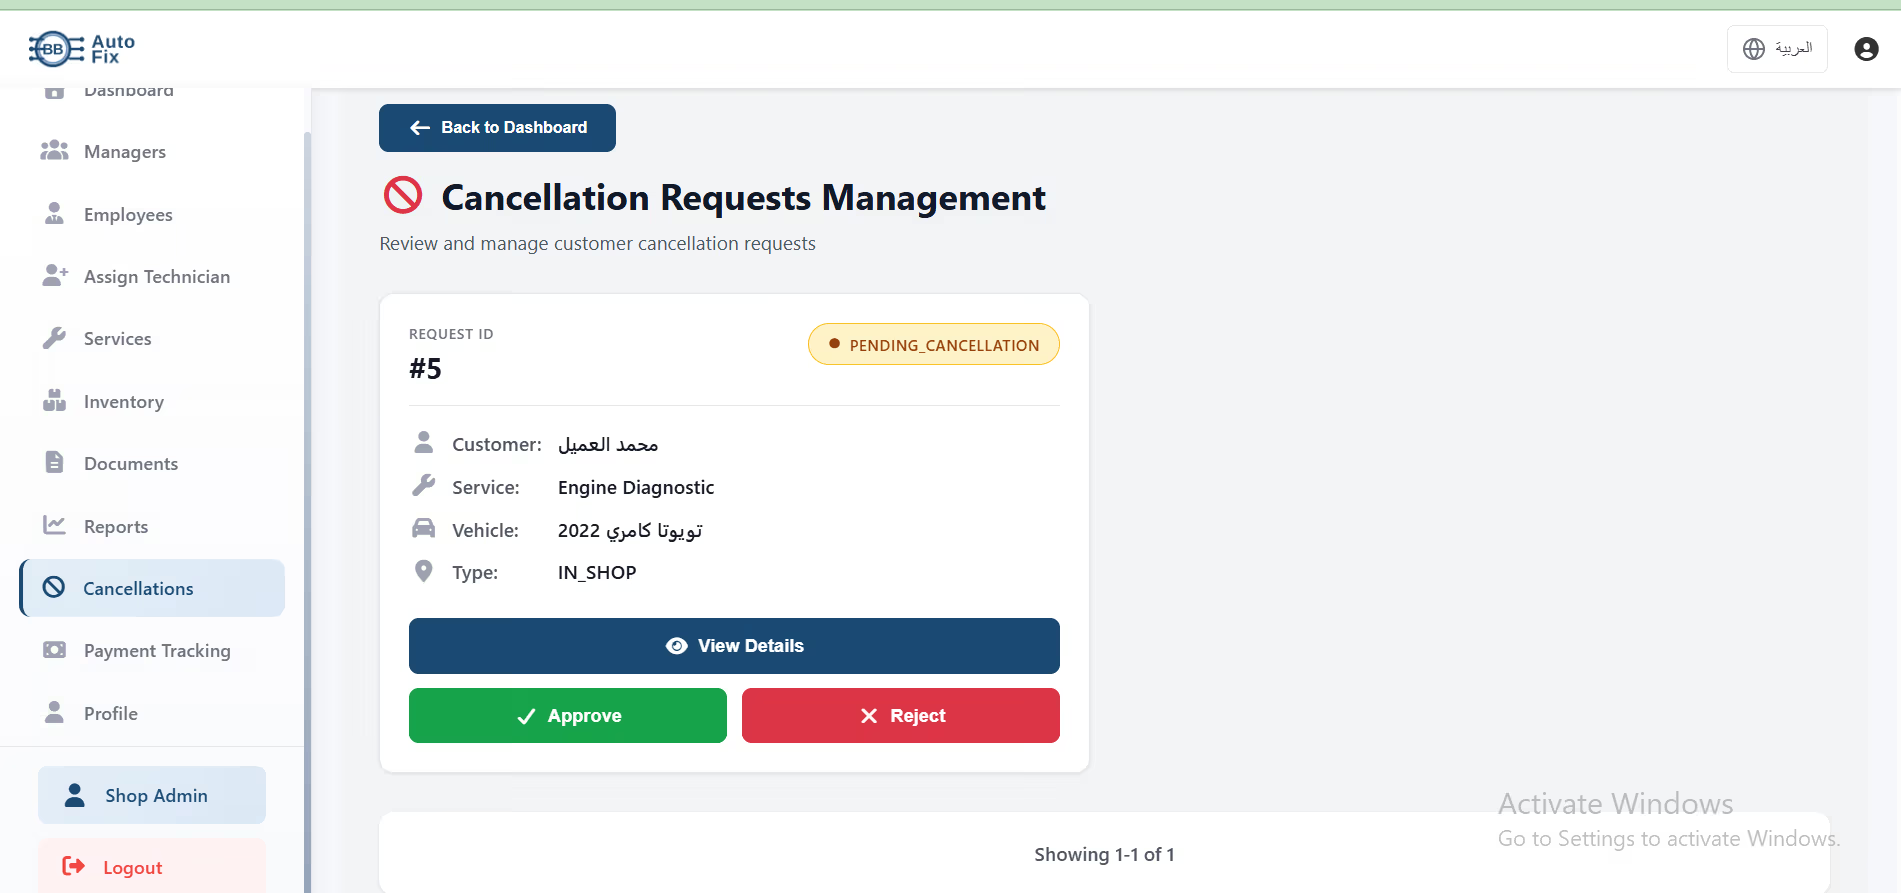
How Cancellation Works
- 1. Customer requests cancellation from their portal
- 2. Request appears in your Cancellation Requests
- 3. You review request details
- 4. You approve or reject
- 5. Customer receives notification of decision
- 6. If approved, job is canceled and any prepayment refunded
How to Handle a Cancellation Request
- Go to Cancellation Requests page
- See list of pending cancellations
- Click 'View Details' on a request to see:
- - Customer name and contact
- - Service booked
- - Vehicle details
- - Booking date and time
- - Cancellation reason (if provided)
- - Job type (In-Shop or Roadside)
- Make decision:
- - Click 'Approve' to accept cancellation
- - Click 'Reject' to deny cancellation
- Add a note explaining your decision (optional)
- Confirm action
- Customer receives notification
When to Approve Cancellations
- • Request made 24+ hours before appointment
- • Customer has emergency/valid reason
- • Job hasn't been assigned to technician yet
- • No parts have been ordered yet
- • Helps maintain good customer relationship
When to Reject Cancellations
- • Request made less than 24 hours before appointment
- • Parts already ordered for this specific job
- • Technician already started work
- • Per your cancellation policy
- • Suspected fraud or abuse
Setting a Cancellation Policy
Create a clear cancellation policy:
- • Free cancellation: 24+ hours before appointment
- • 50% charge: 24 hours or less
- • Full charge: After work has started
- • Communicate this policy to customers at booking
Request Status Indicators
Yellow badge = Pending Cancellation (awaiting your decision)
Green badge = Approved (cancellation accepted)
Red badge = Rejected (cancellation denied)
Payment History
Track all commission payments you've made to the platform. This is your record of monthly commission payments, receipts, and payment status.
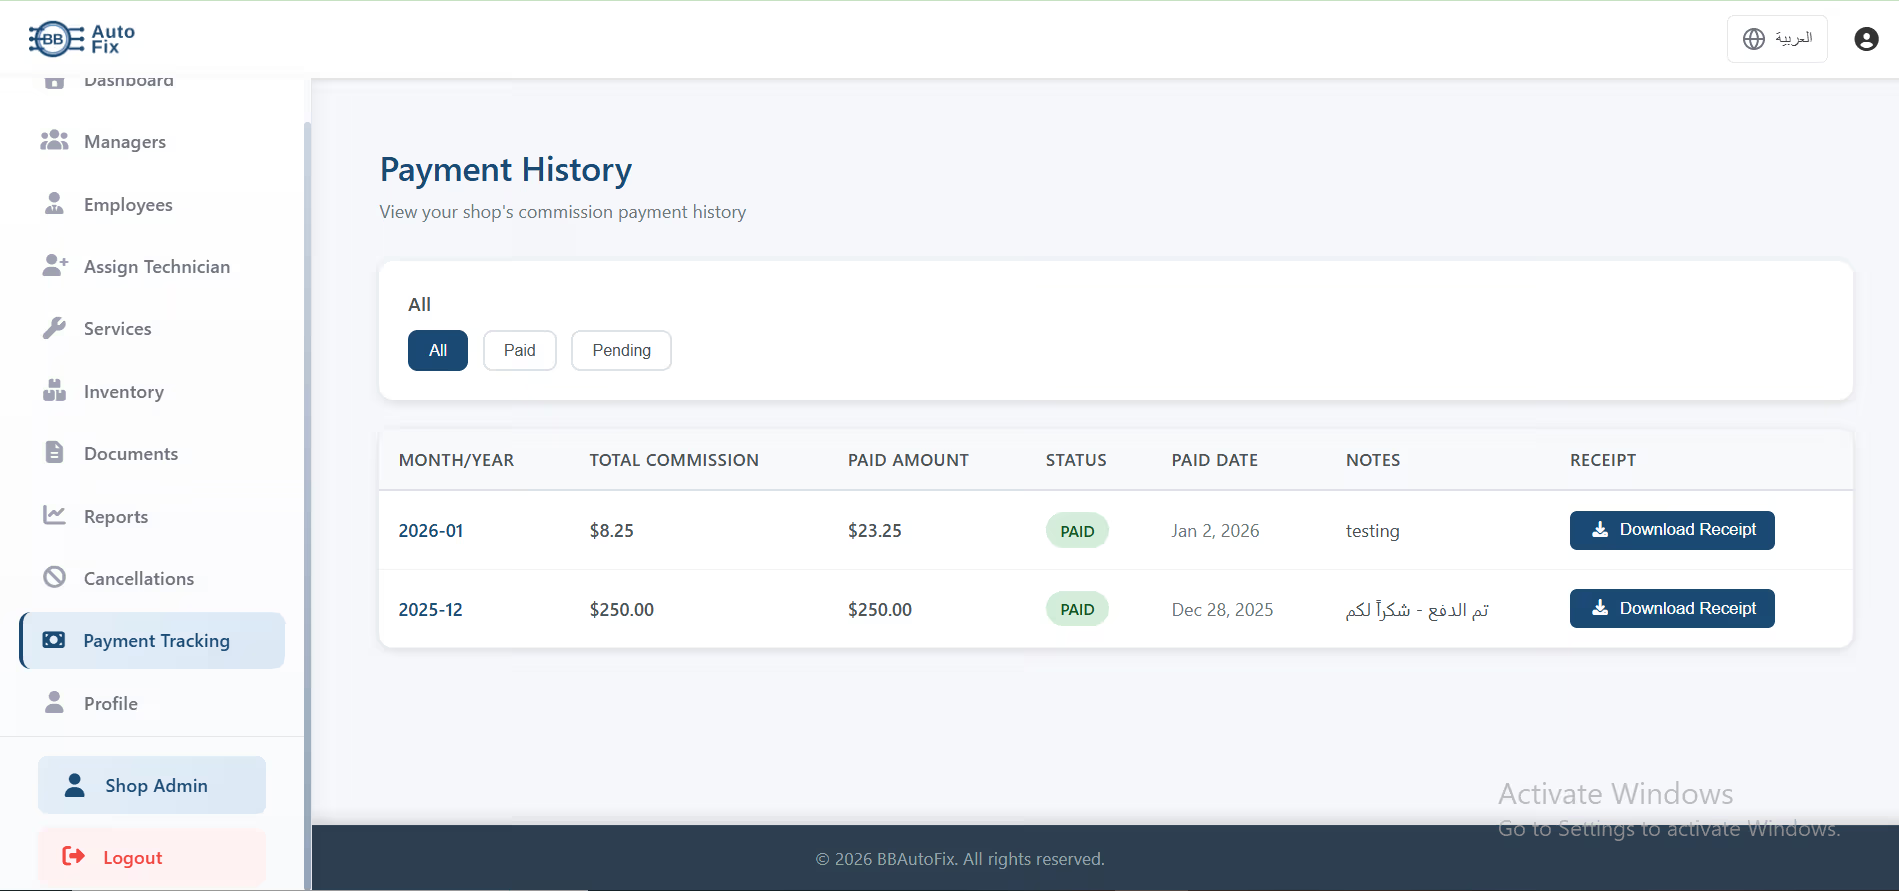
How to View Payment History
- Navigate to Payment History
- See table showing all payments:
- - Month/Year (which period the payment covers)
- - Total Commission (what you owed for that month)
- - Paid Amount (what you actually paid)
- - Status (PAID or PENDING)
- - Paid Date (when payment was received)
- - Notes (admin notes about payment)
- - Receipt (download button)
All
Show all payment records
Paid
Show only completed payments
Pending
Show outstanding balances you still owe
Understanding Your Commission
Your commission is calculated as: (Total Revenue from Completed Jobs) × (Your Commission Rate) = Amount Owed
If you earned $1000 in revenue and your rate is 50%, you owe $500 in commission.
Commission is typically calculated monthly and due within 15 days of month end.
Downloading Payment Receipts
- Find the payment in the table
- Click 'Download Receipt' button
- PDF receipt downloads with:
- - Your shop information
- - Payment amount and date
- - Period covered
- - Receipt number
- - Payment method
- Save for your accounting records
Payment Methods
The admin will specify which payment methods they accept:
Shop Profile
Manage your shop's profile information and your personal account details. This information is visible to customers and the platform admin.
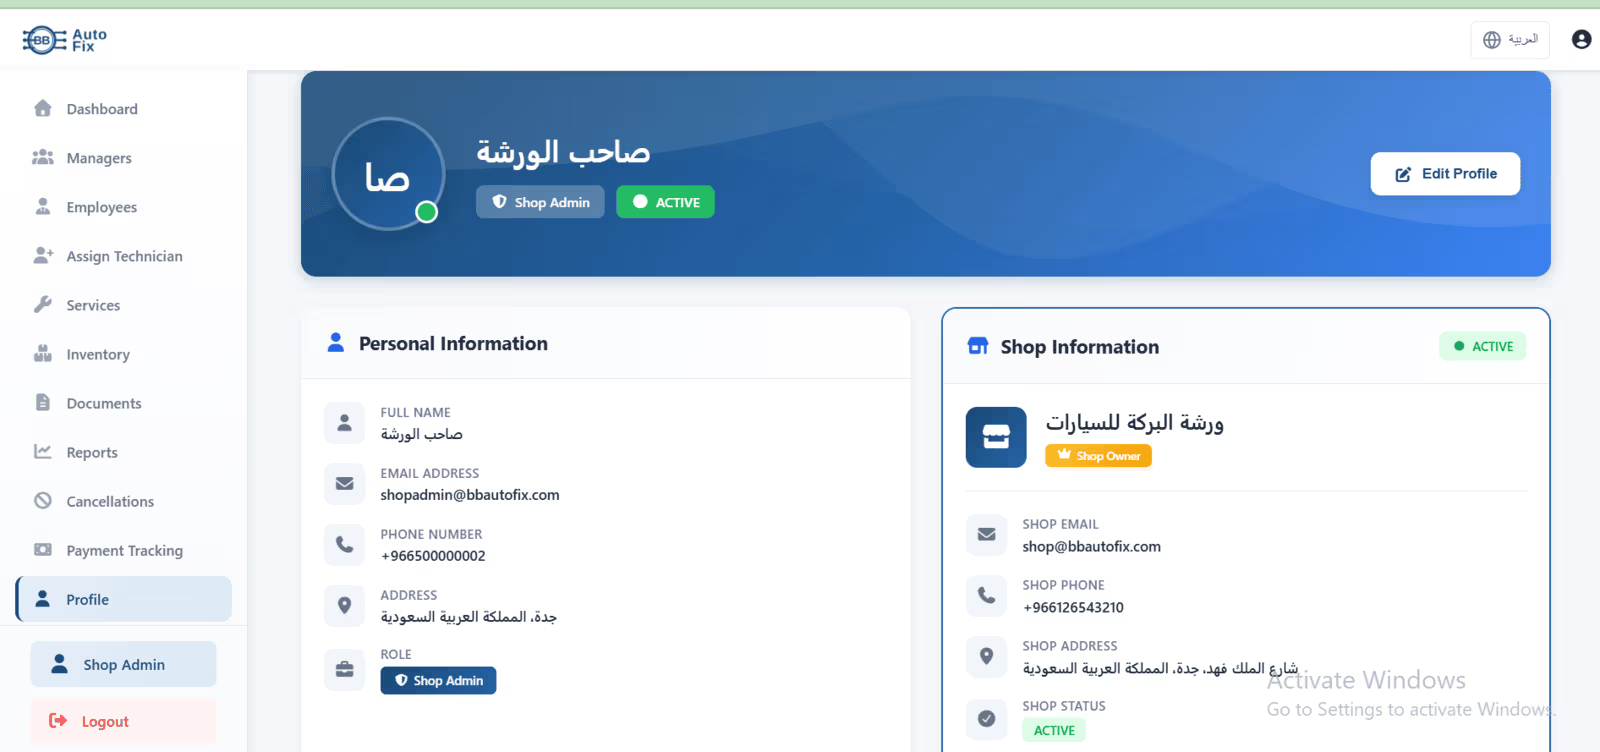
Personal Information Section
Your manager account details:
- • Full Name - Your display name
- • Email Address - Login email
- • Phone Number - Contact number
- • Address - Your location
- • Role - Shop Admin/Shop Manager
Shop Information Section
Your shop's business details:
- • Shop Name - Business name visible to customers
- • Shop Email - Business contact email
- • Shop Phone - Business phone number
- • Shop Address - Physical location
- • Shop Status - Active/Inactive
- • Owner Status - Indicates you're Shop Owner
How to Edit Profile Information
- Click 'Edit Profile' button
- Update any fields you want to change
- Make sure shop information is accurate (customers see this)
- Click 'Save Changes'
- Updates apply immediately
How to Change Your Password
- Click 'Edit Profile'
- Find Password section
- Enter current password
- Enter new password (min 8 characters)
- Confirm new password
- Click 'Update Password'
- Log in with new password next time
Uploading Shop Logo/Photo
- Click 'Edit Profile'
- Click on profile image area
- Select image from computer
- Crop/adjust if needed
- Save changes
- Logo appears on your profile and to customers
Important Notes
- •Keep contact information up-to-date for customer communication
- •Shop name and address are shown to customers when they book
- •Email changes require verification
- •You cannot change shop status (only admin can)
Viewing Your Assigned Jobs
Below the metrics, you'll see a list of all jobs assigned to you. Each job card shows:
- •Job ID - Unique identifier for tracking
- •Customer Name - Who the vehicle belongs to
- •Vehicle Info - Make, model, year (e.g., '2022 Toyota Camry')
- •Service Type - What needs to be done (Oil Change, Brake Service, etc.)
- •Job Status - Current state (Pending, In Progress, or Completed)
- •Job Type Badge - In-Shop Service or Roadside Assistance
Filtering Your Jobs
All - Shows every job assigned to you regardless of location
In-Shop - Shows only jobs where customer brings car to the shop
In-Shop Service (Blue Badge)
Customer brings their vehicle to your shop. You perform the work at your shop location.
Roadside Assistance (Orange Badge)
Customer needs help at their location - breakdown, flat tire, won't start, etc. You travel to their location. These jobs have a 'View Location' button to see the map.
Job Status Indicators
Pending: Pending - Job assigned to you but you haven't started yet
In Progress: In Progress - You're currently working on this job
Completed: Completed - Job finished and marked as done
Your Daily Workflow
- 1. Log in to dashboard at start of shift
- 2. Check 'Assigned Jobs' count to see your workload
- 3. Review job list to see what needs to be done
- 4. Start with highest priority jobs first
- 5. Click on a job to see full details
- 6. Update job status as you work (more on this in Job History)
- 7. Mark jobs as completed when done
- 8. Check dashboard throughout the day for new assignments
Job History & Managing Jobs
This section shows your complete work history - all jobs you've been assigned, worked on, and completed. It's also where you update job status as you work.
Viewing Your Job History
Job History displays all your jobs with filters:
Understanding Job Details
Click on any job to see complete information:
Customer Information:
- Full name
- Phone number (call if you have questions)
- Email address
Vehicle Information:
- Make, Model, Year
- Color
- License Plate Number
- VIN (Vehicle Identification Number)
Service Details:
- Service type requested
- Description of issue/work needed
- Special instructions from customer
- Estimated duration
Job Information:
- Job ID
- Date/Time assigned
- Current status
- Location (for roadside assistance)
How to Update Job Status
- Open the job you want to update
- Find the 'Status' dropdown or buttons
- Select new status:
- - Click 'Start Job' to change from Pending to In Progress
- - Click 'Mark as Complete' when finished
- Add notes (optional but recommended):
- - What work was done
- - Parts used
- - Any issues found
- - Recommendations for customer
- Click 'Update Status'
- Status changes immediately
- Shop manager and customer get notification
Pending → In Progress
Change status to 'In Progress' when you:
- • Start diagnosing the vehicle
- • Begin working on the repair
- • Pull the vehicle into your bay
- • Start the service procedure
In Progress → Completed
Change status to 'Completed' when you:
- • Finish all work
- • Test that repair is successful
- • Clean up work area
- • Vehicle is ready for customer pickup
Adding Job Notes - Best Practices
Good notes help the shop manager and customer understand what was done:
Good: 'Replaced front brake pads and rotors. Brake fluid flushed and topped off. Test drive completed - brakes functioning perfectly. Recommended: Rear brakes at 40% - should be replaced in next 6 months.'
Bad: 'Done'
Good: 'Completed oil change with 5W-30 synthetic oil. Replaced oil filter. Checked all fluid levels - topped off windshield washer fluid. Tire pressure adjusted to 32 PSI all around. No issues found during visual inspection.'
Bad: 'Oil change done'
Searching Job History
Use the search box to find specific jobs by:
📊 Tracking Your Performance
Your job history shows:
- • Total jobs completed (all-time)
- • Jobs completed this week
- • Jobs completed this month
- • Average time per job
- • Customer satisfaction (if ratings enabled)
- • Your most common service types
💡 Use this to see how productive you are and identify areas to improve.
Technician Profile
Your profile contains your personal information, contact details, specializations, and employment information.
Personal Information
- Full Name - Your name as shown to shop manager and customers
- Email Address - Login email and contact
- Phone Number - Contact number for emergencies
- Address - Your home address (private)
- Profile Photo - Your picture (optional)
Your Specializations
Specializations tell the shop manager what types of jobs you're qualified for. Make sure this is accurate!
How to Update Your Profile
- Click 'Edit Profile' button
- Update any fields that need changes
- Update your specializations if you've gained new skills
- Upload or change profile photo
- Click 'Save Changes'
- Profile updates immediately
Changing Your Password
- Go to your Profile
- Click 'Edit Profile'
- Find Password section
- Enter current password
- Enter new password
- Confirm new password
- Click 'Update Password'
Adding Certifications
If you have professional certifications, add them to your profile:
- • ASE Certifications (Automotive Service Excellence)
- • Manufacturer-specific certifications (Toyota, Ford, etc.)
- • Specialty certifications (AC, Electrical, Diesel, etc.)
Certifications help you get assigned to more complex, higher-paying jobs.
Keeping Information Current
- •Update phone number immediately if it changes (for job emergencies)
- •Add new specializations when you complete training
- •Keep email current for receiving job notifications
- •Upload a professional photo to build customer trust
Book Service
The booking system allows you to easily schedule auto repair services with nearby shops. You can book in-shop services or request roadside assistance for emergencies.
How to Book a Service
- Log in to your customer account
- Click 'Book Service' from the main menu
- Browse available services or use the search
- Select the service you need (Oil Change, Brake Service, etc.)
- Choose your service type:
- - In-Shop Service: You bring your vehicle to the shop
- - Roadside Assistance: Technician comes to your location
- Select your preferred shop from the list
- Enter your vehicle details:
- - Make, Model, Year
- - License Plate Number
- - Color
- - VIN (optional)
- Choose your preferred date and time
- Add any special instructions or notes
- Review your booking details
- Click 'Confirm Booking'
- You'll receive a confirmation email and notification
Understanding Service Types
In-Shop Service
You drive or tow your vehicle to the repair shop. Best for scheduled maintenance, diagnostics, or repairs that require shop equipment.
Examples:
- • Regular oil change
- • Tire rotation and alignment
- • Brake pad replacement
- • Engine diagnostics
- • Annual inspection
Roadside Assistance
A technician comes to your current location. Perfect for emergencies or when your vehicle cannot be driven.
Examples:
- • Flat tire change
- • Dead battery jump-start
- • Vehicle won't start
- • Locked out of vehicle
- • Minor roadside repairs
You'll need to provide your exact GPS location or address
Choosing the Right Shop
When selecting a shop, consider:
Booking Tips
- •Book in advance for non-emergency services to get your preferred time
- •Provide detailed vehicle information for accurate service
- •Add notes about specific issues you've noticed
- •Check shop hours and availability before booking
- •Save your favorite shops for quick future bookings
Track Orders
Track the real-time status of your service requests from booking to completion. Stay informed about your vehicle's repair progress.
How to Track Your Order
- Go to 'Track Orders' from the main menu
- See all your active service requests
- Click on any order to view details
- See current status and progress
- View assigned technician information
- Check estimated completion time
- Read any notes from the shop or technician
Understanding Order Statuses
Your booking has been received. The shop is reviewing it and will assign a technician soon.
A technician has been assigned to your job. Work will begin soon.
The technician is actively working on your vehicle. Check back for updates.
Work is finished! Your vehicle is ready for pickup or the technician has completed roadside service.
This service request was cancelled by you or the shop.
Receiving Notifications
You'll receive notifications when:
- • Your booking is confirmed
- • A technician is assigned
- • Work status changes (started, completed)
- • The shop adds notes or messages
- • Your vehicle is ready for pickup
- • Payment is required
Order Details You Can View
- • Service type and description
- • Booking date and time
- • Shop information and contact
- • Assigned technician name
- • Vehicle details
- • Service cost/estimate
- • Current status
- • Completion progress
- • Technician notes
- • Estimated completion time
Service History
Access your complete vehicle service history. View all past services, repairs, and maintenance performed through BB Auto Fix.
How to View Service History
- Navigate to 'Service History'
- See all completed services listed
- Filter by:
- - Date range (Last 30 days, Last 6 months, All time)
- - Service type (Oil Change, Brakes, etc.)
- - Shop name
- - Vehicle (if you have multiple)
- Click on any service to see full details
- Download receipts or service reports
What's in Your Service History
Each service record includes:
Benefits of Service History
- ✓Track maintenance schedule - Know when your next oil change or service is due
- ✓Resale value - Complete service records increase your vehicle's value
- ✓Warranty claims - Proof of regular maintenance for warranty purposes
- ✓Budget planning - See your annual vehicle maintenance costs
- ✓Issue tracking - Identify recurring problems
- ✓Multiple vehicles - Manage service history for all your vehicles in one place
Exporting Service History
Download your service history for:
• PDF - Print or email complete service records
• Excel - Analyze costs and maintenance patterns
• Individual receipts - For specific services
Use Cases:
• Selling your vehicle (provide to buyer)
• Tax purposes (if vehicle used for business)
• Insurance claims
• Personal records
Maintenance Reminders
Based on your service history, the system can remind you about:
- • Next oil change (based on mileage/time)
- • Tire rotation schedule
- • Brake inspection
- • Annual inspections
- • Filter replacements
- • Recommended follow-up services
User Profile
Manage your account information, saved vehicles, payment methods, and preferences.
Personal Information
Your account details:
- • Full Name - Your display name
- • Email Address - Login email and notifications
- • Phone Number - For shop/technician contact
- • Home Address - For location-based services
- • Profile Photo - Optional
How to Edit Your Profile
- Go to 'User Profile'
- Click 'Edit Profile' button
- Update any information you want to change
- Update notification preferences if needed
- Click 'Save Changes'
- Changes apply immediately
Managing Your Vehicles
Add and manage all your vehicles for easy booking:
How to Add a Vehicle
- Go to 'My Vehicles' section
- Click 'Add Vehicle'
- Enter vehicle details:
- - Make (e.g., Toyota, Ford)
- - Model (e.g., Camry, F-150)
- - Year (e.g., 2020)
- - License Plate Number
- - Color
- - VIN (optional but recommended)
- - Current mileage
- Upload vehicle photo (optional)
- Set as primary vehicle (optional)
- Click 'Save Vehicle'
Benefits:
- ✓ Quick booking - Vehicle details auto-fill
- ✓ Track service per vehicle - Separate history for each
- ✓ Mileage tracking - Monitor when services are due
- ✓ Multiple vehicles - Manage entire fleet (family cars, work vehicles)
Payment Methods
Save payment methods for quick checkout:
- • Credit/Debit Cards
- • Digital Wallets
- • Cash (pay at shop)
All payment information is encrypted and secured
Notification Preferences
Choose how you want to be notified:
Channels:
• Email notifications
• SMS/Text messages
• In-app notifications
• Push notifications (mobile app)
Types:
• Booking confirmations
• Status updates
• Completion notifications
• Promotional offers
• Maintenance reminders
Changing Your Password
- Go to Profile Settings
- Click 'Change Password'
- Enter current password
- Enter new password (minimum 8 characters)
- Confirm new password
- Click 'Update Password'
- You'll be logged out and need to log in with new password
Privacy Settings
Control your data and privacy:
- • Make profile public/private
- • Allow shops to contact you with offers
- • Share service history with selected shops
- • Data download - Export all your data
- • Account deletion - Permanently delete your account
Favorite Shops
Save your preferred shops for quick access:
How to Save:
- • When booking, click the star icon on any shop
- • Or go to shop details and click 'Save as Favorite'
- • Access favorites from 'My Favorite Shops' section
- • Quick-book from favorites list
Benefits:
- ✓ Faster booking with trusted shops
- ✓ See your history with each favorite shop
- ✓ Get notified of special offers from favorites